Lightship VPS
Aperçu de Lightship VPS
Grâce au système de positionnement visuel (VPS) de Niantic, les développeurs peuvent créer de riches expériences de localisation AR qui superposent du contenu virtuel au monde physique. Le contenu WebAR peut être ancré dans le monde réel ( ), ce qui permet aux objets virtuels d'interagir avec leur environnement physique. L'expérience de la RA sur le site est ainsi plus personnelle, plus significative et plus immersive, et donne aux utilisateurs de nouvelles raisons d'explorer le monde qui les entoure.
**Note : La localisation de VPS n'est pas encore disponible dans le [Simulateur] (/legacy/getting-started/quick-start-guide/#simulator).
Note: VPS et Geospatial Browser (GSB) requièrent actuellement un Pro plan d'abonnement. Ces fonctionnalités du site ne sont pas disponibles sur le plan de base (gratuit).
Gestion des sites
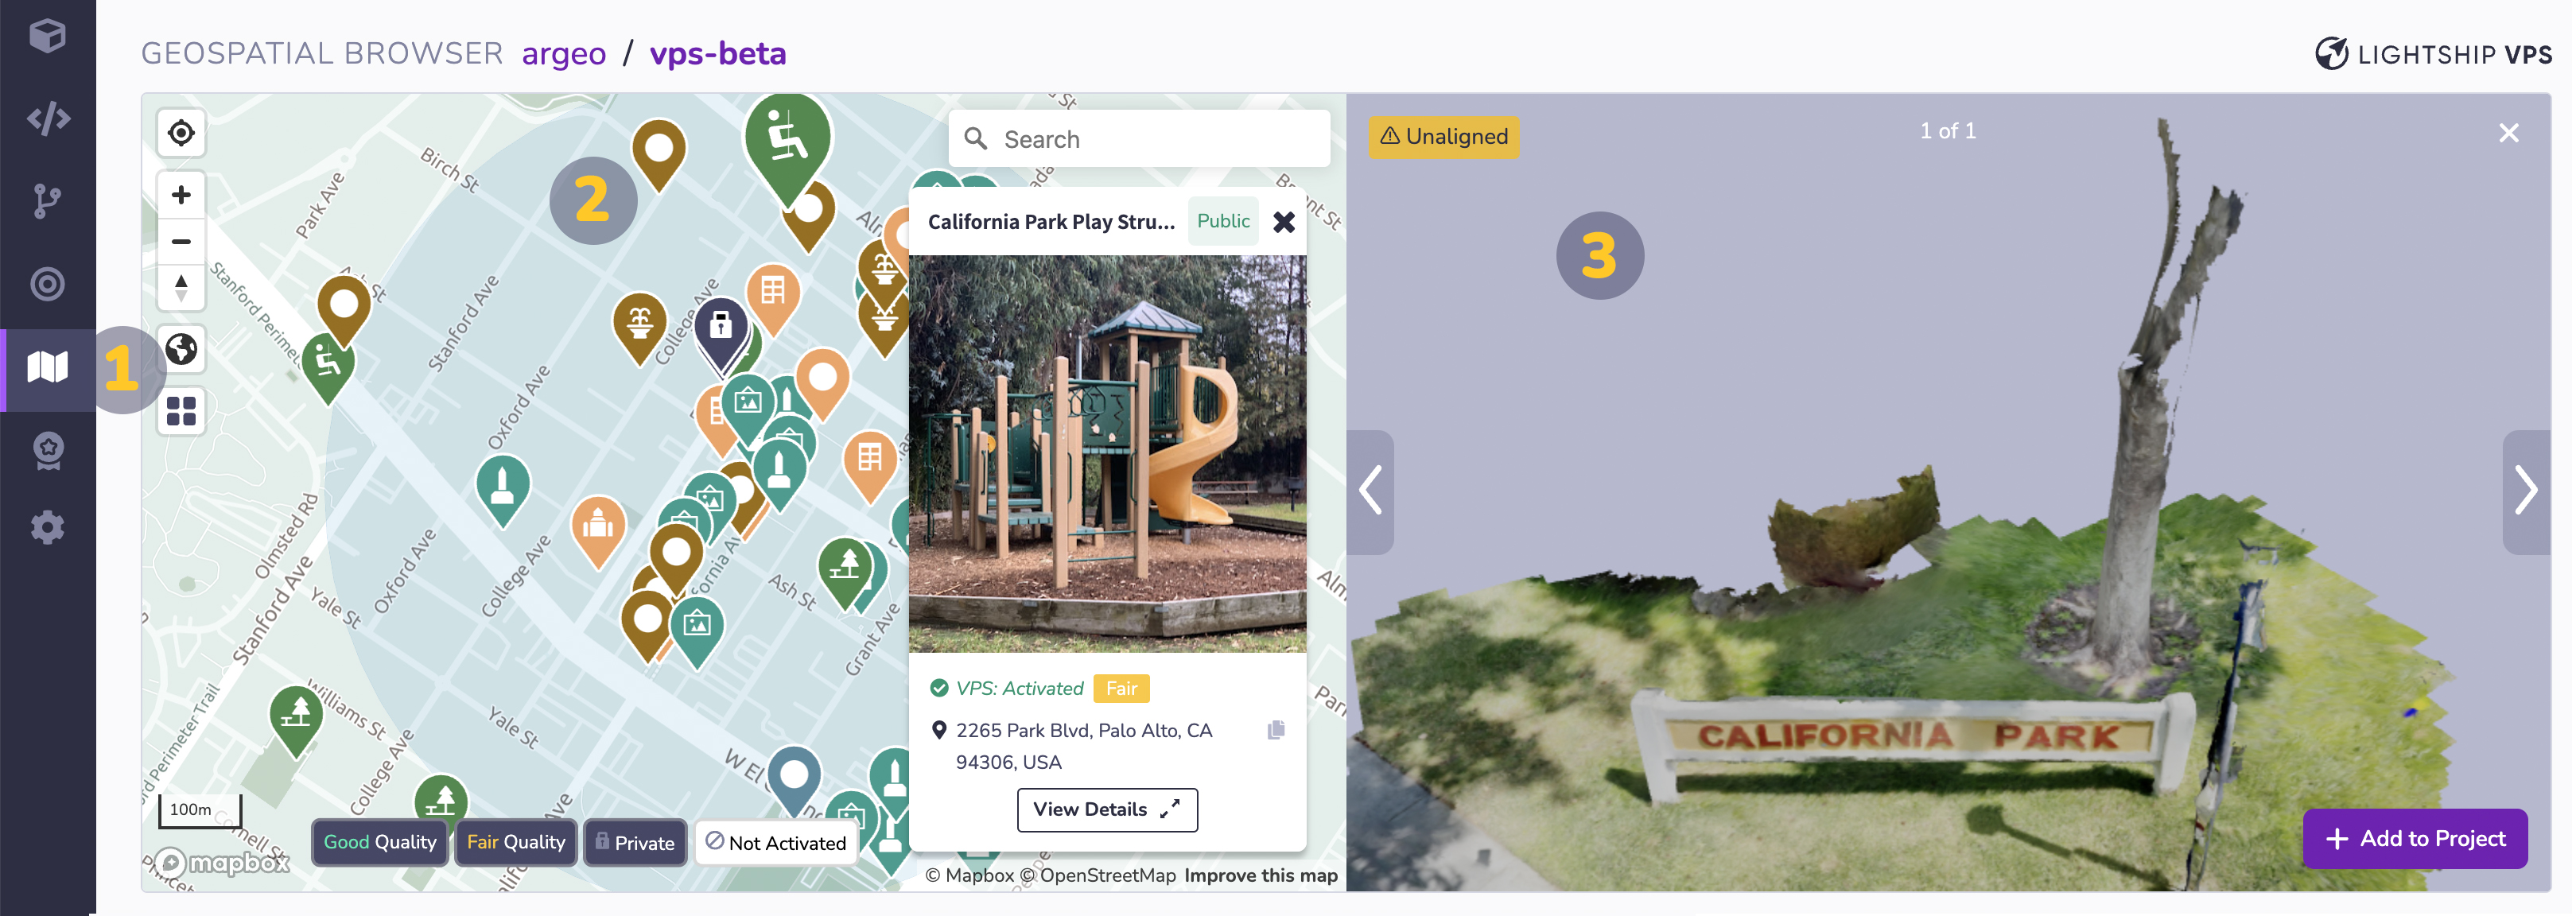
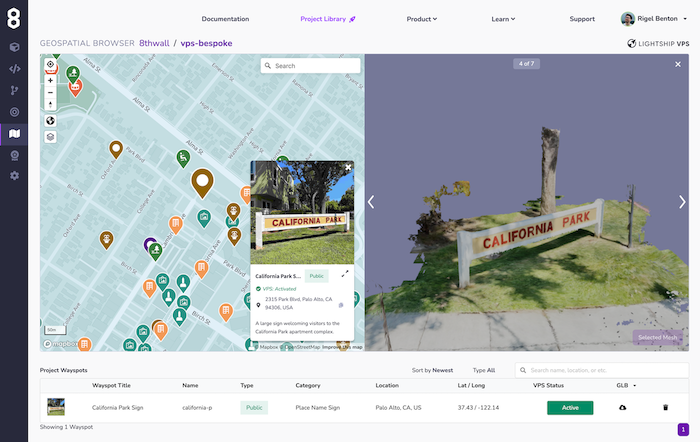
Le navigateur géospatial est accessible à partir de votre projet en sélectionnant l'icône de carte dans le menu de gauche de (annoté comme #1 dans l'image ci-dessous). Sur cette page, vous trouverez une vue cartographique (#2) que vous pouvez utiliser pour rechercher les sites activés par le SPV. La sélection d'un site activé par VPS affichera le maillage 3D du site (#3) afin que vous puissiez vérifier que vous avez sélectionné le site correct et l'ajouter à votre projet (#4).
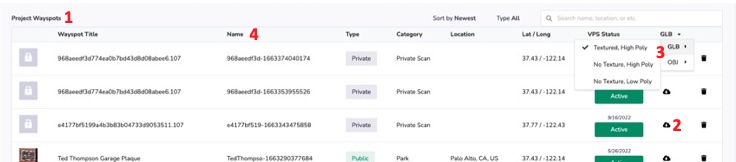
Lorsque vous ajoutez un lieu activé par VPS à votre projet, celui-ci apparaît dans le tableau "Project Locations" du navigateur géospatial (annoté comme #1 dans l'image ci-dessous). Une fois que vous avez un emplacement dans le tableau "Project Locations", vous pouvez utiliser le bouton "Download" (#2) pour télécharger une version GLB ou OBJ (toggle shown as #3) du maillage 3D et l'ouvrir dans des applications logicielles 3D tierces, telles que Blender, ou l'importer directement dans votre projet 8th Wall. Lorsque vous faites référence à des lieux dans votre code de projet, vous devez copier le champ "Nom" (#4) du tableau "Lieux du projet".
Si l'emplacement que vous souhaitez utiliser dans votre projet n'est pas disponible en tant qu'emplacement VPS, vous pouvez créer l'emplacement en suivant les instructions de la section Créer un nouvel emplacement.
Créer un nouvel emplacement
- Cliquez sur un emplacement libre sur la carte pour sélectionner l'endroit où vous souhaitez créer un nouveau site VPS. Voir VPS Location Requirements pour en savoir plus sur le choix d'un bon endroit pour créer un emplacement VPS.
-
Les espaces de travail des plans
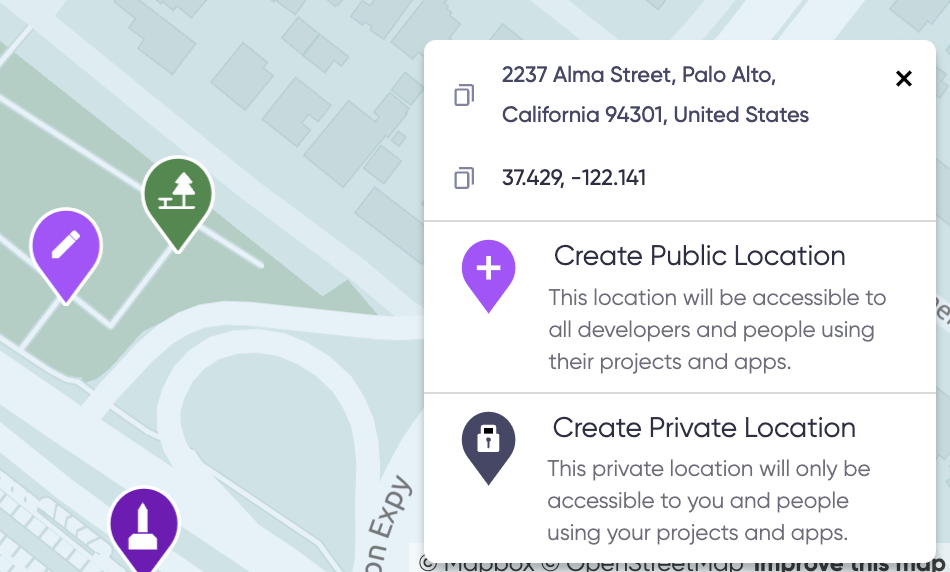
ProouEnterpriseauront l'option de Créer un emplacement public ou Créer un emplacement privé. Les emplacements publics sont accessibles à tous les développeurs et à toutes les personnes qui utilisent leurs projets, tandis que les emplacements privés ne sont visibles et accessibles qu'à votre espace de travail et à ses projets. La création d'un emplacement public est le bon choix pour la plupart des projets ; les emplacements privés sont une fonctionnalité premium pour les développeurs qui ont besoin de créer des expériences VPS temporaires ou à accès contrôlé. Cliquez sur le bouton Créer un lieu public ou Créer un lieu privé pour lancer le processus de création du lieu. -
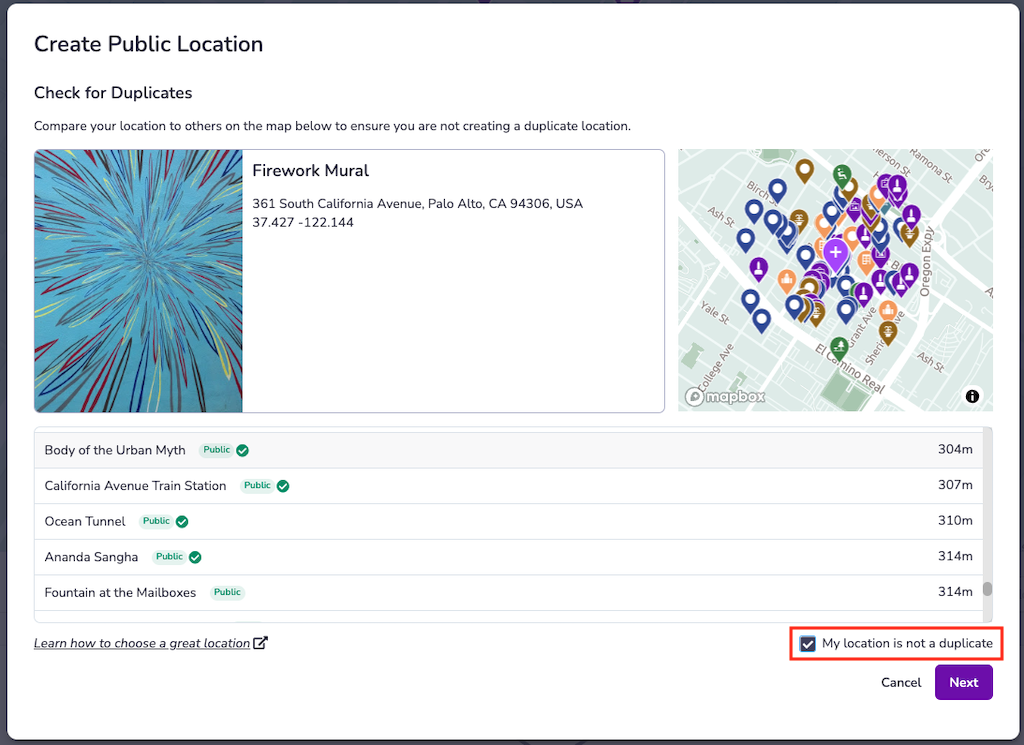
Vérifiez les doublons : Avant de créer un nouveau site, vous devez vérifier que le site n'existe pas déjà. Comparez l'emplacement souhaité à d'autres emplacements déjà présents sur la carte pour vous assurer que vous ne créez pas de doublon. S'il ne s'agit pas d'un emplacement en double, vous devez cocher la case Mon emplacement n'est pas en double et cliquer sur le bouton Suivant pour continuer.
- Ajouter des informations de localisation : Les métadonnées de localisation seront visibles pour les développeurs qui utilisent le navigateur géospatial et peuvent être visibles pour les utilisateurs finaux. N'oubliez pas que l'équipe Trust & Safety de Niantic utilise les informations que vous fournissez pour déterminer si l'emplacement répond à nos critères pour être rendu public . Une fois que vous avez ajouté les informations suivantes pour le lieu que vous essayez de créer, cliquez sur le bouton Submit :
- Titre (125 caractères)
- Description (250 caractères)
- Catégorie (1 ou plus)
- Image (si disponible)
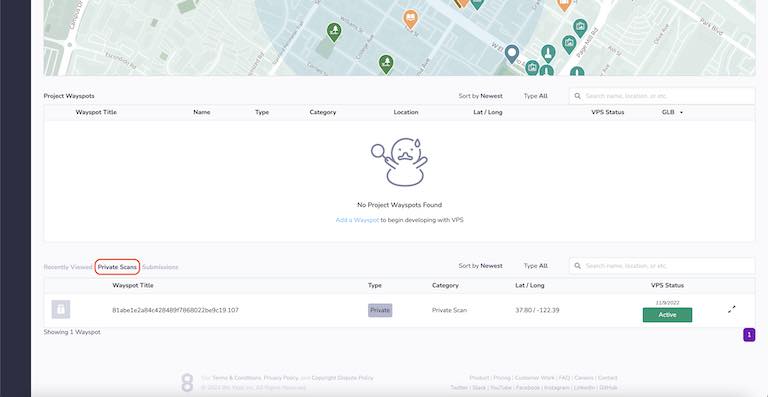
- Votre lieu devrait être immédiatement ajouté à votre onglet "Location Submissions" dans le navigateur géospatial avec son type ("Public" ou "Private") et son statut ("Not Activated"). Il sera disponible à l'adresse pour être analysé dans les minutes qui suivent et l'activation du SPV pourra être demandée une fois qu'il aura été entièrement analysé.
Scaniverse pour les développeurs de Niantic
Scaniverse pour les développeurs Niantic intègre de manière transparente le navigateur géospatial (GSB) avec l'expérience de numérisation primée de Scaniverse. Ce site rationalise considérablement les flux de travail des développeurs en ce qui concerne la navigation sur la carte, l'ajout d'emplacements et, bien sûr, la numérisation ( ) :
- Nous avons rendu le navigateur géospatial (GSB) convivial pour les mobiles afin qu'il puisse être utilisé efficacement dans Scaniverse pour parcourir la carte, inspecter les emplacements, ajouter des emplacements et demander l'activation d'un VPS
- Nous avons remplacé le processus de connexion à l'application Wayfarer par un simple code QR qui relie Scaniverse à votre compte 8th Wall.
- Nous avons adopté l'interface utilisateur existante de Scaniverse pour faciliter la création et le téléchargement de scans.
- Nous avons permis de tester la localisation dans les sites activés par le VPS au sein de Scaniverse.
- Nous avons intégré les dernières améliorations apportées au filtrage des cartes afin qu'il soit plus facile que jamais de trouver le(s) site(s) que vous recherchez.
Lien entre Scaniverse et le navigateur géospatial (GSB)
Prérequis : Installez Scaniverse à partir de l'[App Store] iOS (https://apps.apple.com/us/app/scaniverse-3d-scanner/id1541433223). La prise en charge des appareils Android est imminente.
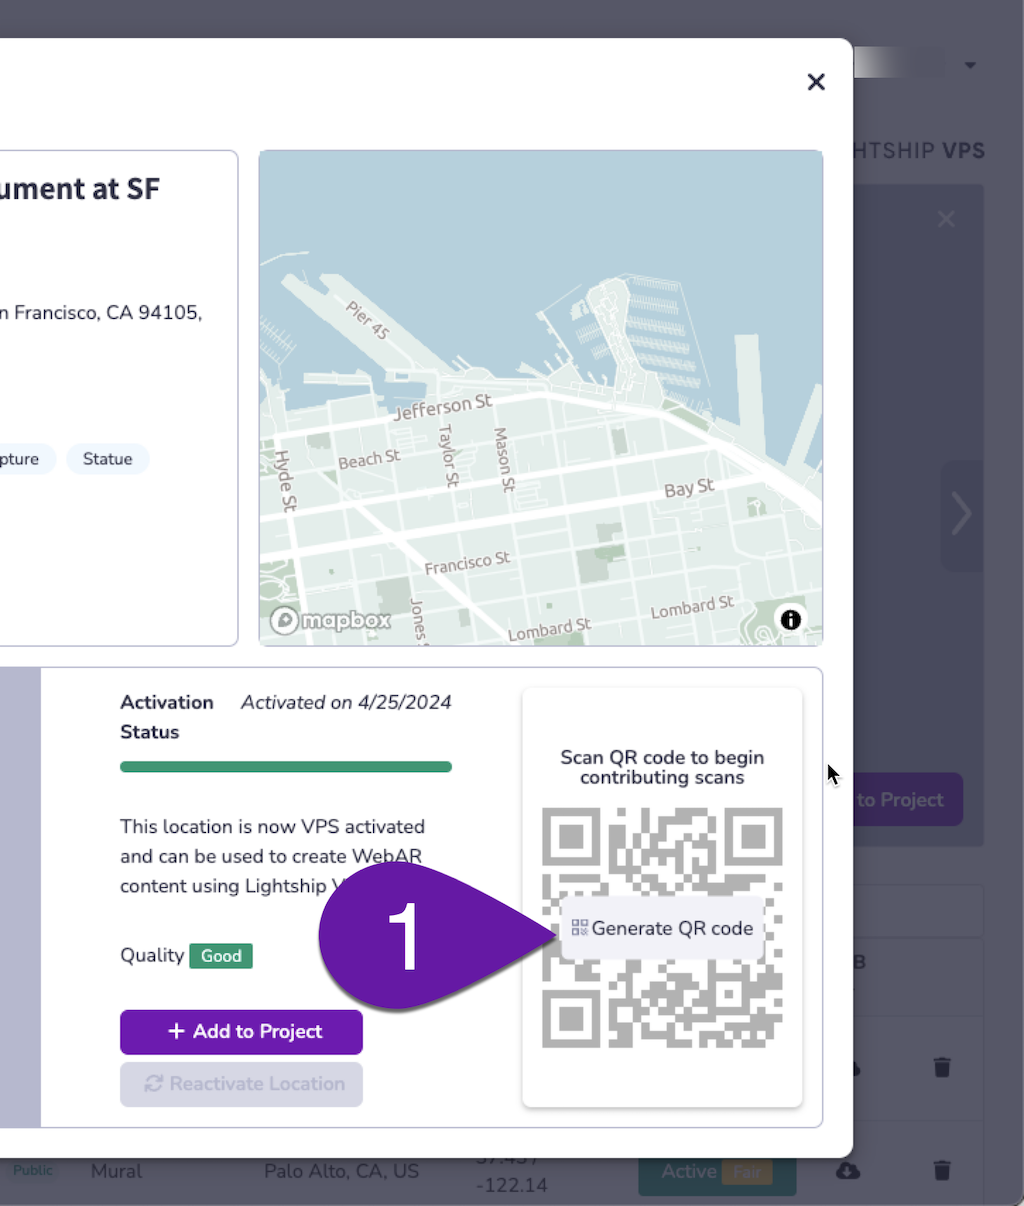
- Connectez-vous à votre compte 8th Wall sur votre ordinateur. Ouvrez le Geospatial Browser (GSB), sélectionnez n'importe quel emplacement sur la carte, puis sélectionnez View Details. Dans le coin inférieur droit de la carte de détails de l'emplacement , appuyez sur Générer un code QR. Un code QR s'affiche.
-
Scannez le code QR avec votre application Appareil photo. Ouvrez l'application Appareil photo sur votre téléphone et pointez-la sur le code QR.
-
Tapez sur le lien Scaniverse qui apparaît. Cela permettra de relier Scaniverse à votre compte de développeur 8th Wall . Cette opération ne doit être effectuée qu'une seule fois.
infoVeillez à autoriser www.8thwall.com à utiliser votre position actuelle lorsque vous y êtes invité ; cela est nécessaire au bon fonctionnement de l'interface GSB. :: :

-
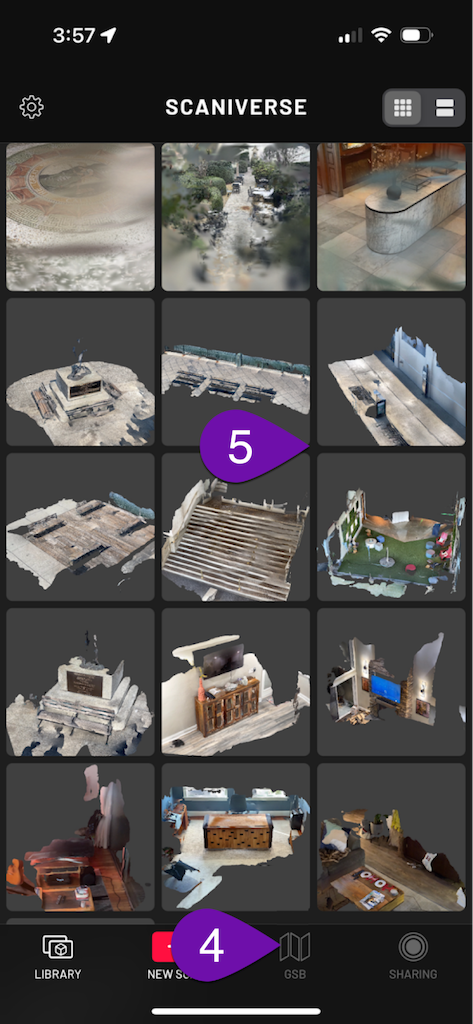
Une fois que vous avez relié Scaniverse à GSB, vous pourrez revenir à l'écran GSB à tout moment en appuyant sur le bouton GSB dans le ruban inférieur de l'application Scaniverse. Notez que vous pouvez déconnecter Scaniverse de GSB à tout moment en allant dans le menu Settings et en désactivant l'option Niantic Developer Mode.
-
Tous les scans que vous avez pris en dehors du mode développeur de Niantic resteront accessibles lorsque liera ou déliera Scaniverse avec GSB.
Parcourir la carte du GSB dans Scaniverse
-
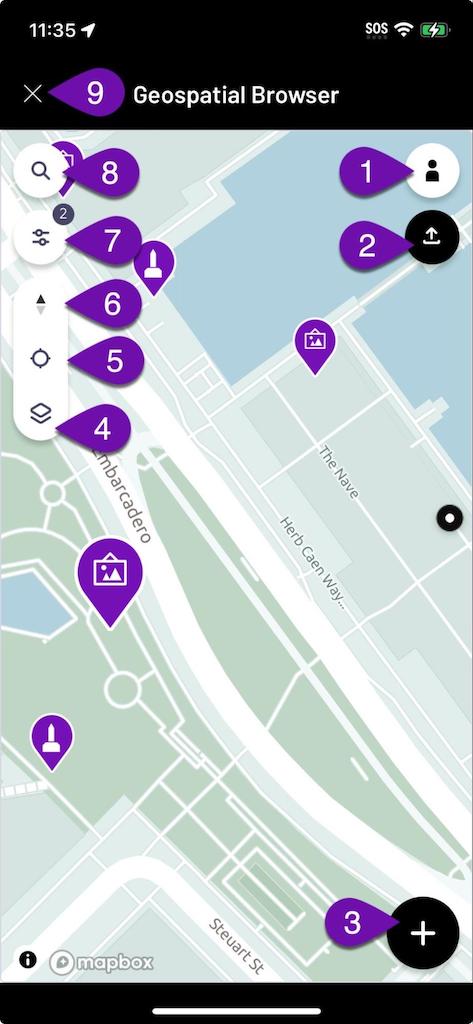
En tapant sur l'icône Personne, vous pourrez sélectionner votre espace de travail du 8e mur.
-
En cliquant sur le bouton Télécharger, vous pourrez sélectionner l'emplacement des scans à télécharger. Notez que seuls les scans provenant du mode développeur de Niantic (à l'aide des options Add Scans ou Test Scan) peuvent être téléchargés vers Niantic à des fins de développement de VPS.
-
En cliquant sur le bouton Plus, vous pourrez créer de nouveaux emplacements et tester des balayages.
-
En appuyant sur le bouton Couches, la vue satellite de la carte s'affiche.
-
Le fait d'appuyer sur le bouton Réticule permet de centrer la carte sur votre position.
-
Le fait d'appuyer sur le bouton Compas ramène la carte à son orientation par défaut, vers le nord.
-
Le bouton Contrôles vous permet d'appliquer des filtres aux lieux qui apparaissent sur la carte en fonction de leur taille, de leur catégorie ou de leur statut d'activation.
-
Le bouton Verre grossissante vous permet d'effectuer une recherche sur la carte.
-
En appuyant sur le bouton X, vous fermerez le GSB et reviendrez à l'écran d'accueil de Scaniverse.
-
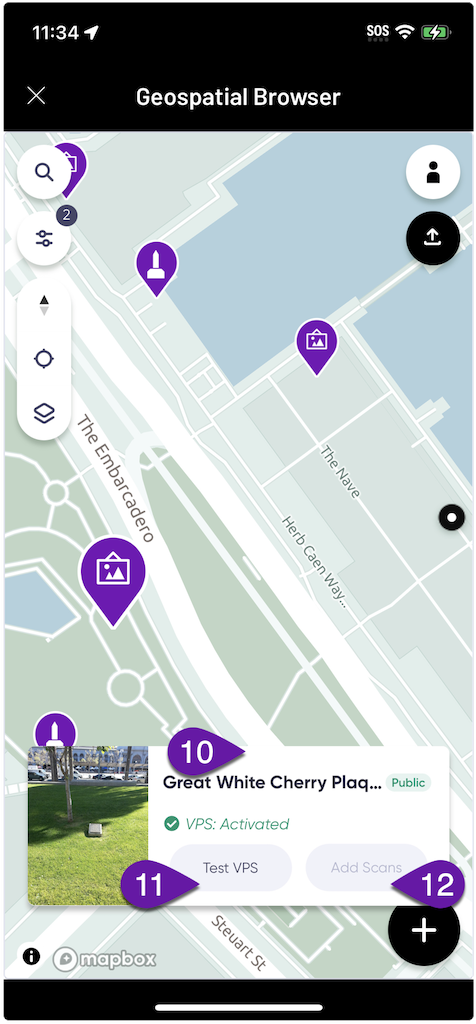
La sélection d'un lieu sur la carte fait apparaître un écran Preview, sur lequel on peut appuyer pour obtenir plus de détails sur .
-
Si vous avez sélectionné une localisation activée par le SPV, vous pouvez cliquer sur le bouton Tester le SPV pour vérifier que la localisation de fonctionne.
-
Pour créer un scan à ajouter à un emplacement particulier, appuyez sur le bouton Ajouter des scans de l'emplacement correspondant. Notez que vous devez vous trouver à proximité de l'emplacement pour que l'option Ajouter des scans soit disponible.
Création et téléchargement de scans
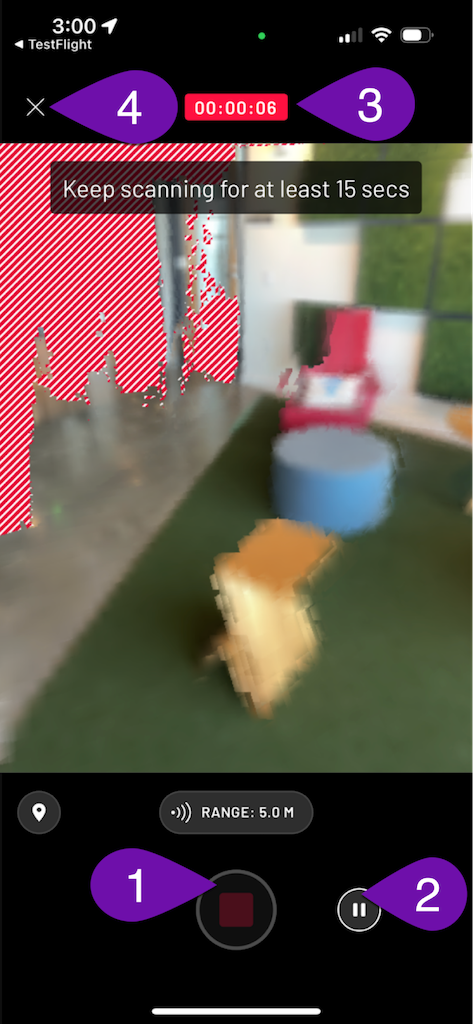
-
Le bouton Enregistrer permet de démarrer et d'arrêter le processus de numérisation.
-
Le bouton Pause peut être utilisé pour suspendre temporairement le processus de numérisation.
-
L'affichage Temps indique la durée du balayage en cours. Une durée minimale de 15 secondes est requise pour qu'un scan puisse être téléchargé à des fins de développement du SPV. Une durée de balayage de 30 à 60 secondes est idéale (les balayages de plus de 60 secondes sont divisés en plusieurs parties à des fins de traitement ).
-
En appuyant sur le bouton X, vous retournerez à l'écran d'accueil de Scaniverse.
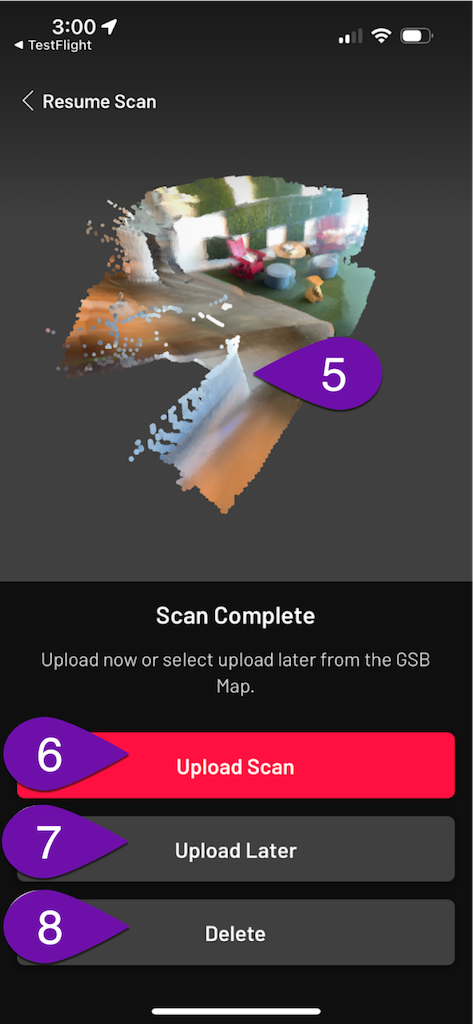
-
Lorsque vous avez terminé un balayage, vous pouvez inspecter un Preview Mesh de la scène que vous avez capturée.
-
Si vous êtes satisfait de votre scan, vous pouvez choisir de le télécharger immédiatement en cliquant sur le bouton Upload Scan.
-
Vous pouvez également choisir de Télécharger plus tard si vous souhaitez utiliser une connexion WiFi (recommandé).
-
Si vous n'êtes pas satisfait de votre numérisation, vous pouvez la rejeter en appuyant sur le bouton Effacer.
Installation de Niantic Wayfarer
Pour scanner de nouveaux emplacements VPS ou ajouter des scans à des emplacements déjà activés, vous devez installer l'application Niantic Wayfarer sur votre téléphone à l'adresse . Voir ci-dessous les instructions d'installation et d'utilisation .
iOS
L'application Wayfarer de Niantic nécessite iOS 12 ou une version ultérieure et un iPhone 8 ou une version ultérieure. Un appareil compatible LiDAR n'est pas nécessaire.
Pour installer l'application Niantic Wayfarer, rendez-vous sur Testflight for Niantic Wayfarer (8th.io/wayfarer-ios) sur votre appareil iOS.
Utilisation de Niantic Wayfarer
Vous pouvez ajouter des scans à Public Locations ainsi que créer Test Scans avec l'application Niantic Wayfarer.
Une fois l'application installée, connectez-vous avec vos identifiants 8th Wall en appuyant sur le bouton Login with 8th Wall.
Si vous avez accès à plusieurs espaces de travail, sélectionnez un espace de travail en cliquant sur le menu déroulant 8th Wall Workspace sur la page de profil.
| Page de connexion | Page de profil |
|---|---|
 | 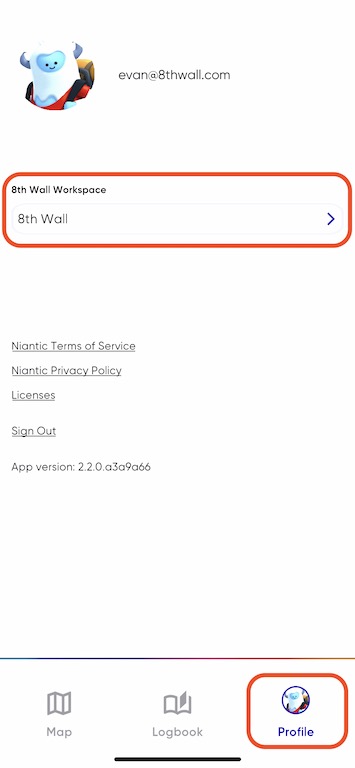 |
Sur la page Map, sélectionnez un emplacement VPS pour ajouter une numérisation à un emplacement public (1), ou sélectionnez Scan pour ajouter une numérisation de test à votre espace de travail (2).
Effectuer un balayage de la zone en utilisant la [technique de balayage] recommandée (#scanning-technique).
| Page de carte | Page de numérisation |
|---|---|
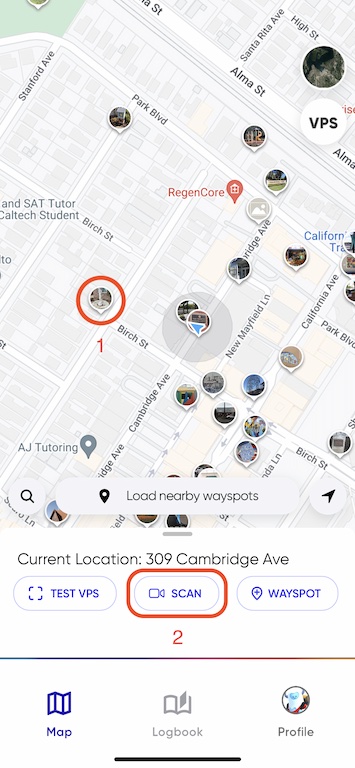 | 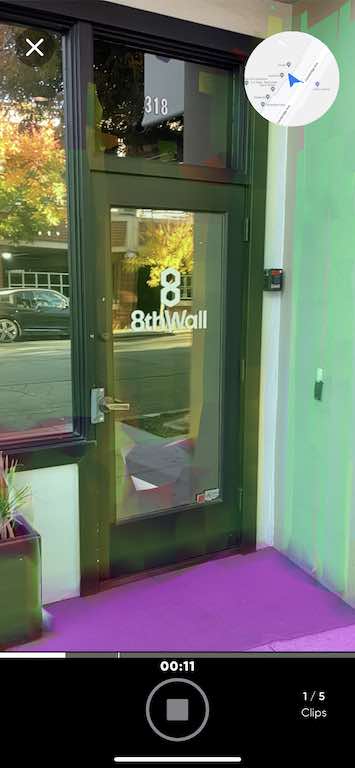 |
Une fois l'analyse terminée, sélectionnez public ou test, puis téléchargez.
| Type de balayage | Chargement du scan |
|---|---|
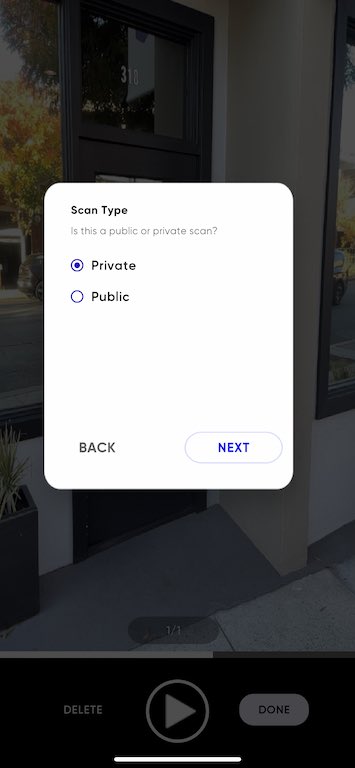 |  |
Le traitement des scans peut prendre de 15 à 30 minutes. Une fois traités, les scans s'affichent dans le navigateur géospatial.
Les questions relatives à la numérisation ou au traitement doivent être adressées à support@nianticspatial.com.
Vous trouverez plus d'informations sur l'utilisation de l'application Wayfarer dans la documentation Lightship.
Technique de balayage
Les emplacements activés par le SPV scannés ne doivent pas dépasser un diamètre de 10 mètres autour de l'emplacement. Par exemple, une statue typique fonctionnerait comme un site activé par VPS. En revanche, un bâtiment entier, , ne le serait pas. Une face ou une porte/entrée dans un bâtiment pourrait faire l'affaire. Pour commencer, nous vous recommandons de vous en tenir à pour les petites surfaces (par exemple, un bureau, une statue ou une peinture murale).
Avant de scanner, soyez conscient de votre environnement et assurez-vous que vous avez le droit d'accéder au lieu que vous scannez.
-
Vérifiez la zone à numériser et les environs de l'objet numérisé pour déterminer s'il y a des obstacles et pour sélectionner un itinéraire de numérisation. Il est nécessaire de planifier l'itinéraire que vous avez l'intention d'utiliser pour le balayage avant de commencer la procédure.
-
Assurez-vous que la mise au point de votre appareil photo est correcte. Le tremblement de la caméra peut avoir un effet négatif sur la reconstruction en 3D. Maintenez votre téléphone le plus près possible de votre corps pour éviter les flous. Marchez autour de l'objet que vous scannez à l'adresse au lieu de rester à un endroit précis et de déplacer votre téléphone.
-
Marcher à un rythme lent et naturel. Se déplacer lentement et sans à-coups pendant le balayage. Les changements brusques de direction sont à proscrire. Déplacez-vous lentement et sans à-coups en gardant les pieds au sol. Si vous numérisez à l'adresse dans un environnement sombre, il est encore plus important de se déplacer lentement et sans à-coups. Déplacez le téléphone avec vous lorsque vous vous déplacez (pensez à la marche en crabe).
-
L'emplacement du SPV doit toujours être le point central. Pour que nous puissions construire la carte, il est important de se concentrer sur l'emplacement du SPV et de capturer l'orbite complète à 360° de celui-ci. S'il n'est pas sûr ou pas possible d'obtenir une couverture à 360°, capturez autant que possible.
-
Variez la distance et les angles (0-10m ou 0-35ft). Pour que la carte 3D fonctionne bien dans différents scénarios , il est important que nous capturions l'environnement autour du lieu et que nous disposions d'une variété de scans différents. Il est important de varier la distance et les angles de vue lors de l'analyse de l'emplacement.
Vidéo de la technique recommandée de balayage de l'emplacement du SPV :
Choses à éviter lors de la numérisation de
-
Évitez de scanner lorsque l'environnement n'est pas sûr, par exemple au milieu de la route ou dans une aire de jeux avec des enfants.
-
Évitez de scanner lorsque l'emplacement est trop éloigné (>10m ou 35ft) ou trop grand pour que votre appareil photo puisse faire la mise au point ( ).
-
Évitez de scanner pendant que vous vous promenez ou que vous faites du jogging. Il est important de garder le site comme point central à tout moment.
-
Évitez de pointer votre téléphone vers des objets très lumineux tels qu'une lumière fluorescente ou le soleil.
-
Évitez de ne pas bouger ou de bouger trop vite lorsque vous scannez. Les mouvements brusques entraînent des décalages dans la reconstruction du site .
-
Évitez de numériser si votre téléphone devient trop chaud. Si la température de l'appareil augmente trop, les performances de seront fortement réduites, ce qui aura un effet négatif sur la numérisation.
-
Évitez de télécharger des scans qui semblent incomplets ou qui ne sont pas représentatifs de ce que vous essayez de scanner sur .
Scanners d'essai
Les scans de test sont un maillage unique, accessible à un seul espace de travail, pour développer et tester les expériences VPS . Bien que les analyses de test soient une excellente solution pour développer et tester des expériences VPS pendant qu'un emplacement public est en cours de nomination ou d'activation, leur utilisation n'est pas autorisée dans les projets publiés sur .
Les scans de test sont créés à l'aide de l'application Niantic Wayfarer. Assurez-vous que vous êtes connecté à Wayfarer en utilisant les informations d'identification de 8th Wall et que l'espace de travail correct est sélectionné sur la page Profil. Le scan du site ne sera disponible que dans l'espace de travail 8th Wall sélectionné au moment du scan et du téléchargement de . Les scans ne peuvent pas être déplacés vers un autre espace de travail ou un autre compte Lightship.
Dans l'application Wayfarer, sélectionnez Scan et prenez un scan de la zone.
Les balayages de test doivent durer 60 secondes ou moins ; une nouvelle maille est générée toutes les 60 secondes - le balayage de pendant 120 secondes donnera donc lieu à 2 balayages de test. Tous les balayages de test sont non alignés.
Une fois traité, vous pouvez prévisualiser le maillage et l'ajouter à votre projet à partir du navigateur géospatial onglet Test Scans.
Si le traitement de votre scan test échoue, il se peut que vous deviez effectuer un nouveau scan. Contactez support@nianticspatial.com pour plus d'informations.
Types d'emplacements
Dans le navigateur géospatial, vous verrez quatre types d'emplacements différents :
| Type | Icône | Description |
|---|---|---|
| Public |  | Les lieux "publics" ont été approuvés par l'équipe Trust & Safety de Niantic et répondent aux critères de sécurité et d'accessibilité au public. Ces lieux peuvent être utilisés dans des projets publiés. |
| En attente |  | Les emplacements "en attente" sont examinés par l'équipe Trust & Safety de Niantic afin de déterminer s'ils répondent aux critères de sécurité et d'accessibilité au public. **Les localisations en attente peuvent être scannées et activées en attendant la fin de l'examen. |
| Rejeté |  | Les lieux "rejetés" peuvent avoir échoué à l'examen de confiance et de sécurité de Niantic, être un doublon d'un lieu existant ou précédemment rejeté, ou ne pas être autorisés par Niantic pour une autre raison. Ces lieux ne peuvent pas être ajoutés à des projets. |
| Test |  | Les emplacements "test" ne sont accessibles à votre espace de travail qu'en scannant l'emplacement à l'aide de l'application Wayfarer de Niantic. Les lieux de test sont destinés à être utilisés pendant le développement et peuvent ne pas être inclus dans un projet publié. |
Pour toute question ou problème lié à la création de sites VPS, ou pour vérifier le statut d'un site existant, veuillez contacter support@nianticspatial.com.
Localisation Statut
Dans le navigateur géospatial, vous verrez cinq statuts différents pour les emplacements VPS :
| Statut | Icône | Description |
|---|---|---|
| Non activé | Les sites dont le statut est "Non activé" n'ont pas fait l'objet d'une analyse. Un minimum de 10 numérisations viables doit être soumis pour le lieu avant de pouvoir demander l'activation. Après l'envoi d'un scan, l'état de l'emplacement devient "Scanning". | |
| Numérisation |  | Les sites dont le statut est "en cours d'analyse" ont fait l'objet d'au moins une analyse. Un minimum de 10 numérisations viables doit être soumis pour le lieu avant de pouvoir demander l'activation. |
| Traitement |  | Les sites dont le statut est "en cours de traitement" ont fait l'objet d'une demande d'activation et afficheront le statut "en cours de traitement" jusqu'à ce que le processus d'activation soit terminé. En règle générale, une demande d'activation est traitée dans les 4 heures. Vous recevrez un courriel lorsque la procédure sera terminée. |
| Actif | Les sites dont le statut est "actif" peuvent être utilisés dans des projets de création de contenu WebAR à l'aide de VPS for Web. | |
| Échec | Les sites dont le statut est "Échec" ont rencontré un problème au cours du processus d'activation. Cela peut résulter d'un certain nombre de facteurs, tels qu'une mauvaise adéquation de l'emplacement pour le SPV, des analyses insuffisantes ou des données corrompues. Malheureusement, cela signifie que cet emplacement ne peut pas être utilisé pour créer du contenu WebAR à l'aide d'un VPS. Nous vous encourageons à trouver un nouveau lieu à utiliser dans votre projet de 8e mur. |
Pour toute question ou problème lié à la numérisation, à l'activation ou au statut de la localisation, veuillez contacter support@nianticspatial.com
Exigences en matière de localisation
Lors du choix d'un emplacement pour l'utilisation d'un VPS, il convient de tenir compte des éléments suivants :
- Le SPV fonctionne mieux dans des lieux distincts et cohérents (par exemple, une plage de sable ou un patio bondé avec des meubles mobiles ne fonctionnera pas bien).
- Les lieux dominés par des éléments réfléchissants ou transparents (par exemple, les fenêtres et les miroirs) sont déconseillés sur le site .
- Plus l'expérience est grande, plus vous devrez numériser pour capturer l'espace ; la taille maximale recommandée par pour une expérience VPS est aujourd'hui de 400 m^2 (20 x 20 m), bien que des expériences plus grandes puissent être prises en charge par avec une numérisation minutieuse.
Exigences en matière de lieux publics
Les Lieux publics sont accessibles à tous les développeurs et à toutes les personnes qui utilisent leurs projets et leurs applications. Lorsque ajoute un nouveau lieu public, veuillez tenir compte des lignes directrices suivantes :
- Les lieux publics doivent être des lieux ou des objets permanents, physiques, tangibles et identifiables.
- Les lieux publics doivent être sûrs et accessibles aux piétons.
- Veillez à inclure des informations précises dans le titre, la description et la photo afin d'aider vos utilisateurs à trouver le lieu.
Exigences en matière d'emplacement privé
Les Lieux privés sont une fonctionnalité premium pour les développeurs qui ont besoin de créer des expériences VPS temporaires ou à accès contrôlé sur . Ils ne sont visibles et accessibles que dans l'espace de travail qui les a créés. Lors de la création d'un nouveau lieu privé, veuillez tenir compte des éléments suivants :
- Les emplacements privés ne peuvent être découverts que par l'espace de travail qui les a créés, de sorte qu'ils ne peuvent être analysés et localisés ( ) que par les membres et les utilisateurs des projets de cet espace de travail.
- Les emplacements privés sont un bon choix si vous construisez une expérience spéciale à accès contrôlé (par exemple, sur votre propriété privée ou celle de votre client).
- Les lieux privés sont également une option si vous créez une expérience dans un lieu public qui a temporairement une apparence différente (par exemple, un concert, une exposition dans un musée ou un autre événement spécial).
Localisation Quantités
Il n'y a pas de limite au nombre de lieux qui peuvent être associés à un projet 8th Wall. Les emplacements sont localisés côté serveur via le service VPS.
Lieu Événements
8th Wall émet des événements à différentes étapes du cycle de vie de l'emplacement du projet (par exemple, numérisation, recherche, mise à jour de , perte, etc.) Veuillez consulter la référence de l'API pour obtenir des instructions spécifiques sur la gestion de ces événements dans votre application web :
Emplacement Qualité
Une fois qu'un lieu a été activé par le VPS, Niantic fournit une évaluation de la qualité dans le navigateur géospatial. Les détails de l'emplacement affichent soit Moyenne qualité, soit Bonne qualité.
La qualité de l'emplacement fait référence à la capacité de l'emplacement à se localiser à tout moment. Les sites disposant de plusieurs scans dans tous les types d'éclairage ont tendance à être de meilleure qualité. Les lieux pour lesquels le nombre de numérisations requises est minimal ou pour lesquels la majorité des numérisations dans un type d'éclairage ( ) ont tendance à être de moins bonne qualité.
L'évaluation de la qualité est un processus automatisé et peut ne pas refléter la performance réelle du lieu. La meilleure façon de déterminer la qualité est de l'essayer soi-même.
Emplacement Alignement
L'avertissement de non-alignement peut se produire pour diverses raisons et signifie que la localisation par rapport au maillage ne peut pas être garantie . Bien que le maillage puisse fonctionner correctement pour la localisation, l'avertissement indique que le maillage est expérimental et qu'il doit être utilisé à vos risques et périls.
Note : Tous les scans test sont non alignés.
Activation de Lightship VPS
Pour activer le VPS dans votre projet WebAR, vous devez mettre enableVPS à true.
Pour les projets A-Frame, définissez enableVps : true sur le composant xrweb sur le site <a-scene>
Pour les projets non-AFrame, définir enableVps : true dans l'appel à XR8.XrController.configure() avant
le démarrage du moteur.
Exemple - AFrame
<a-scene
  coaching-overlay
  landing-page
  xrextras-loading
  xrextras-runtime-error
  ...
  xrweb="enableVps : true ;">
Exemple - Non-AFrame
XR8.XrController.configure({enableVps: true})
// Ensuite, démarrer le moteur du 8ème mur
Développer des expériences VPS sur mesure
Les scènes VPS sur mesure sont conçues pour un lieu unique et utilisent un maillage de référence du navigateur géospatial pour aligner le contenu AR.
Partie 1 : Ajouter un lieu à la scène
- Ouvrir le navigateur géospatial (icône de carte 🗺 à gauche)
- Trouvez un site activé par le SPV (ou nommez/activez votre propre site)
- Ajouter le lieu au projet
Partie 2 : Utiliser Location GLB comme référence pour une animation AR personnalisée
- Téléchargez la référence GLB à partir du côté droit de la ligne.
- Utilisez-le dans votre logiciel de modélisation 3D (Blender, Maya, A-Frame, etc.) pour positionner le contenu AR par rapport à l'origine du maillage.

IMPORTANT : L'origine de ce modèle 3D est l'origine de l'emplacement. NE RÉINITIALISEZ PAS L'ORIGINE OU VOTRE CONTENU NE SERA PAS ALIGNÉ.
FINALEMENT : Si le maillage téléchargé à partir du Geospatial Browser n'est pas d'une qualité suffisante pour être utilisé dans une animation cuite, un matériau physique ou un matériau d'occlusion, vous pouvez envisager de prendre un scan à l'aide d'une application tierce comme Scaniverse et d'aligner ce maillage de haute qualité avec celui téléchargé à partir du Geospatial Browser .
- Importer le GLB d'animation dans l'éditeur de nuages et l'ajouter à la scène
- Ajoutez le composant "named-location" au fichier
<a-entity>de votre ressource. L'attribut "name" fait référence au "nom" de l'emplacement du projet dans le navigateur géospatial.
Ta-da ! 🪄 Votre animation doit être alignée sur l'emplacement dans le monde réel.
Partie 3 : Ajout de l'occlusion et des ombres
- Dans votre scène, ajoutez
<a-entity named-location="name: LOCATIONNAME"><a-entity> - Ajoutez trois
<a-entity>à l'intérieur de cet élément en tant qu'enfants. Il s'agit de la maille de l'occluder, de la maille de l'ombre et de l'animation du VPS. - Dans le premier
<a-entity>, ajoutezxrextras-hider-materialetgltf-model="#vps-mesh". "#vps-mesh" doit renvoyer à une version de votre BGL de référence dont les textures ont été supprimées et la géométrie décimée. - Dans le second
<a-entity>, ajoutezshadow-shader,gltf-model="#vps-mesh", etshadow="cast : false". Le shader d'ombre applique un matériau d'ombre au maillage de référence avec un décalage de polygones pour éviter la lutte contre les Z. Le shader d'ombre applique un matériau d'ombre au maillage de référence avec un décalage de polygones pour éviter la lutte contre les Z. Vous pouvez choisir si vous voulez que le vps-mesh projette une ombre sur le monde réel avecshadow="cast : true". - Dans le troisième
<a-entity>, ajoutezgltf-model="#vps-anim",reflections="type : realtime",play-vps-animationetshadow="receive:false".play-vps-animationattend que levps-coaching-overlayait disparu avant de jouer l'animation VPS.
Développement à distance

Il est souvent utile d'utiliser l'inspecteur A-Frame pour positionner du contenu à distance sur votre bureau. Pour configurer la scène de ce projet pour le développement du bureau à distance, désactivez les composants suivants en ajoutant une lettre au début (c'est-à-dire "Znamed-location") :
xrweb->Zxrwebxrextras-loading->Zxrextras-loadinglocalisation nommée->localisation nomméexrextras-hider-material->Zxrextras-hider-material
Vous pouvez maintenant ouvrir le A-Frame Inspector (Mac : ctrl + opt + i, PC : ctrl + alt + i) et positionner le contenu par rapport au maillage VPS importé du Geospatial Browser. N'oubliez pas qu'il s'agit d'un inspecteur. Vous devrez copier les valeurs de transformation dans votre code.
En option, vous pouvez temporairement repositionner le <a-entity named-location> au centre de la scène
pour accélérer l'itération. NOTE : réinitialisez <a-entity named-location> à position="0 0 0" pour vous assurer que le contenu de VPS
est aligné correctement.
*Développement mobile à distance

Il est souvent utile d'utiliser l'inspecteur A-Frame pour simuler un SPV à distance sur votre appareil mobile. Pour configurer la scène de ce projet pour le développement mobile à distance, désactivez les composants suivants en ajoutant une lettre au début (c'est-à-dire "Znamed-location") :
localisation nommée->localisation nomméexrextras-hider-material->Zxrextras-hider-material
Ensuite, vous devez désactiver le VPS et activer l'échelle absolue. Cela permettra de s'assurer que le maillage de référence est correctement dimensionné pour une simulation précise :
xrweb="enableVps : false ; scale : absolute ;" .
Vous devriez temporairement repositionner le <a-entity named-location> au centre de la scène
pour accélérer l'itération. Essayez d'aligner la base de votre maillage de référence sur y="0" (le sol).
NOTE : Avant de déployer votre projet VPS, réinitialisez <a-entity named-location> à position="0 0 0"
pour vous assurer que le contenu du VPS est correctement aligné.
Développer des expériences procédurales pour le SPV
Les scènes procédurales du SPV sont conçues pour utiliser n'importe quel emplacement détecté (par opposition aux emplacements de projet spécifiques). Une fois détecté, le maillage de l'emplacement est à votre disposition pour créer des expériences VPS générées de manière procédurale.
Deux événements liés à la procédure sont émis par le moteur de 8th Wall :
- xrmeshfound : émis lorsqu'un maillage est trouvé pour la première fois, soit après le démarrage, soit après un recentrage().
- xrmeshlost : émis lors de l'appel de recenter().
Une fois qu'un maillage est détecté, le moteur 8th Wall continue de suivre ce maillage jusqu'à ce que la fonction recenter() soit appelée.
FAQ VPS
Qu'est-ce que Lightship VPS ?
Lightship VPS (Visual Positioning System) est un service en nuage qui permet aux applications de localiser l'appareil d'un utilisateur dans des lieux réels, ce qui permet aux utilisateurs d'interagir avec du contenu AR persistant et , ce qui permet de nouvelles expériences immersives. VPS détermine la position et l'orientation de l'appareil (pose) en se référant à aux données cartographiques qui existent dans le nuage de Niantic.
Comment fonctionne le VPS ?
Lorsqu'un appareil appelle le service VPS, le service reçoit une image de requête de l'appareil de l'utilisateur ainsi que sa position approximative (à partir du GPS) en tant qu'entrées et tente de le localiser à l'aide de la ou des cartes qui existent à l'endroit où il se trouve. Si la localisation est réussie, le service renvoie la position et l'orientation (pose) de l'appareil correspondant à l'horodatage de l'image transmise par . Comme il s'écoule un certain temps entre le moment où une image de requête VPS est capturée et celui où une réponse est reçue du service VPS, l'appareil doit disposer d'un système de suivi des mouvements à l'adresse afin de rester localisé avec précision lorsqu'il est en mouvement. Lorsque le service VPS renvoie une estimation de la position à l'appareil , la différence de position du système de suivi de l'appareil est ajoutée à la réponse de localisation afin que le VPS puisse "suivre" la façon dont l'appareil s'est déplacé en attendant la réponse du serveur à la requête du VPS.
Qu'est-ce qu'un scan ?
Les scans AR des joueurs, des développeurs et des géomètres sont l'ingrédient fondamental utilisé pour créer la carte Niantic : La carte du monde en 3D de Niantic. Les scans AR sont enregistrés et téléchargés à l'aide du cadre de scannage AR de Niantic, un module utilisé dans Pokemon Go, Ingress et l'application Wayfarer. Chaque scan AR consiste en une série d'images vidéo avec des données complémentaires provenant d'accéléromètres et de capteurs GPS qui construisent un modèle 3D du monde à partir de plusieurs images 2D. Les scans AR sont utilisés par Niantic pour construire des cartes et des maillages de lieux réels.
Qu'est-ce qu'une carte ?
Dans le jargon du SPV, une carte est l'artefact de données utilisé pour localiser votre appareil lorsque l'API du SPV est appelée à l'adresse . Une carte peut être considérée comme une fonction qui prend une image d'interrogation en entrée et renvoie la position et l'orientation (pose) en sortie. La carte correspondant à un lieu donné est créée à partir des scans qui ont été téléchargés à cet endroit. Les cartes VPS ne sont pas lisibles par l'homme.
Qu'est-ce qu'une maille ?
Dans le langage du SPV, un maillage est un modèle 3D d'un lieu ou d'un objet réel. Les maillages fournissent une représentation détaillée d'un espace ou d'un objet physique, et sont utiles pour comprendre à quoi ressemble un lieu , comme référence pour la création de contenu AR, et pour créer des effets physiques et d'occlusion. Comme les cartes , les maillages qui correspondent à un lieu donné sont créés à partir des scans qui ont été téléchargés à ce lieu. Les maillages sont lisibles à la fois par l'homme et par la machine.
Où puis-je utiliser un VPS ?
Le SPV est disponible dans plus de 150 000 lieux dans le monde réel, et de nouveaux lieux sont ajoutés chaque jour. Sur , pour qu'un lieu soit disponible sur VPS, une quantité suffisante de données de scan AR doit être téléchargée sur et le processus d'activation du VPS doit être achevé. Les développeurs peuvent ajouter de nouveaux lieux à et demander l'activation de VPS pour des lieux entièrement numérisés à l'aide du navigateur géospatial.
Comment fonctionne l'activation d'un VPS ?
Pour qu'un site soit éligible à l'activation du SPV, il doit avoir téléchargé au moins 10 scans qui passent les contrôles de qualité minimums de , et la différence de temps entre les scans les plus anciens et les plus récents sur le site doit être d'au moins 5 heures. Ces exigences garantissent que les cartes et les maillages obtenus sont d'une qualité suffisante et qu'ils capturent suffisamment de variations pour que les utilisateurs puissent effectuer une localisation fiable. Le processus d'activation des VPS s'appuie sur l'infrastructure de cartographie AR de Niantic et implique de nombreuses étapes complexes sur le site . À partir de l'ensemble des scans éligibles sur le site, un algorithme sélectionne la plupart des scans pour afin de les utiliser pour construire des cartes et des maillages, et la poignée restante pour la validation et la mesure de la qualité de la localisation . Le processus d'activation d'un lieu se déroule sur les serveurs de Niantic et prend généralement 1 à 2 heures sur le site .
Puis-je retrouver mes scans après l'activation du VPS ?
Au cours du processus d'activation, les cartes et les maillages créés à partir des scans téléchargés sont fusionnés à l'adresse afin d'intégrer autant d'informations que possible. Le produit final, qui est utilisé par les développeurs pour créer du contenu et par les utilisateurs pour le localiser, se compose de scans provenant de nombreuses sources différentes. Les données des scanners sont mélangées pour créer une représentation plus complète du lieu, . Il n'y a donc pas de relation univoque entre les scanners qui sont téléchargés sur un lieu et les cartes et maillages qui sont créés une fois que le lieu est activé par le système VPS.
Puis-je ajouter d'autres analyses à un site déjà activé ?
Dans certains cas, les développeurs peuvent souhaiter ajouter des balayages supplémentaires à un lieu précédemment activé sur afin d'améliorer la qualité et la couverture des cartes et des maillages du lieu. Sur , pour qu'un site soit éligible à la "réactivation", il doit avoir fait l'objet d'au moins 5 balayages supplémentaires depuis sa dernière activation. Au contraire, le processus de réactivation nécessite la construction d'une nouvelle carte fusionnée qui incorpore les nouveaux balayages dans le contexte des balayages existants.
Comment puis-je demander l'activation d'un nouveau site ?
Une fois qu'un lieu a téléchargé suffisamment de scans pour répondre aux exigences d'activation du SPV (au moins 10 scans au total avec une différence de temps d'au moins 5 heures entre les scans les plus anciens et les plus récents), les développeurs peuvent demander l'activation du SPV en sélectionnant le lieu dans l'application Wayfarer ou le navigateur géospatial et en appuyant sur le bouton "Activer". Cela ajoutera le lieu à la file d'attente d'activation. En général, une demande d'activation de est traitée dans les deux heures. Les développeurs ont également la possibilité de demander la réactivation d'un lieu existant après avoir téléchargé 5 scans supplémentaires.
Le SPV fonctionne-t-il la nuit ou dans de mauvaises conditions météorologiques ?
Le SPV fonctionne mieux lorsqu'il y a une bonne visibilité. Afin de maximiser les chances de réussite de l'expérience VPS, il est préférable de télécharger de nombreuses analyses AR couvrant un large éventail de conditions différentes (par exemple, différentes heures de la journée, différentes conditions météorologiques, etc.) Par exemple, si vous construisez une expérience dans un endroit où il pleut beaucoup, il est très utile d'avoir des images d'un jour de pluie .
La numérisation AR et le VPS nécessitent-ils des téléphones équipés de capteurs LiDAR ?
Le balayage AR et le VPS ne nécessitent pas de LiDAR.