クイックスタートガイド
このガイドでは、Niantic 8th Wall StudioとCloud Editorを使用するために必要な手順を説明します。
第8回ウォール・アカウントの作成
第8ウォールアカウントを作成すると、以下のことが可能になります:
- **モバイル・ウェブ・ブラウザで直接動作するリッチなウェブARやウェブVR体験、3Dウェブ・ゲームを作成できます。
- 当社のビジュアルツールとゲームエンジンを使用してください。
- チームメンバーと協力し、ソース管理にコードを保存する。
- 開発中のプロジェクトを即座にプレビューできます。
- 複数のデバイスからのライブコンソールログで、リアルタイムにコードをワイヤレスデバッグ**。
- **8th Wallのグローバルネットワークでホストされているプロジェクトを公開します。
- 商用プロジェクトのサブスクリプション、請求情報、ライセンスを管理します。
- 8thwall.comに公開プロ��フィールと特集プロジェクトを作成し、あなたの 作品、ライブデモ、コードを紹介できるようにしましょう。
**新規ユーザーhttps://8thwall.com/get-started、無料で制作を開始
**既存ユーザーログイン https://www.8thwall.com/login
無料で作成
Niantic 8th Wall StudioとBuilt-in Hostingプラットフォームは誰でも無料で利用でき、Cloud Editorは有料契約をしているワークスペースが利用できる。 8th Wallは無料のベーシックプランを提供しており、 、クレジットカード( )なしで、8th Wallのフルパワーにアクセスし、WebAR体験を構築し始めることができる。 8th Wallは無料のベーシックプランを提供しており、 、クレジットカード( )なしで、8th Wallのフルパワーにアクセスし、WebAR体験を構築し始めることができる。
商用またはブランド作品には、Proプランと商用ライセンスが必要です。8th Wallサブスクリプションと ライセンスは、キャンセルするまで自動更新されます。 一部または未使用の 月分の払い戻しまたはクレジットはありません。 購読設定の管理は、 アカウント設定ガイド をご覧ください。 一部または未使用の 月分の払い戻しまたはクレジットはありません。 購読設定の管理は、 アカウント設定ガイド をご覧ください。
-
8番目の壁のホームページまたは価格設定ページから、無料で作成をクリックします。
-
お名前、メールアドレス、パスワードを入力してアカウントを作成するか、ソーシャルログインをご利用ください。 確認し、 :8番目の壁利用規約に同意し、 次へをクリックします。
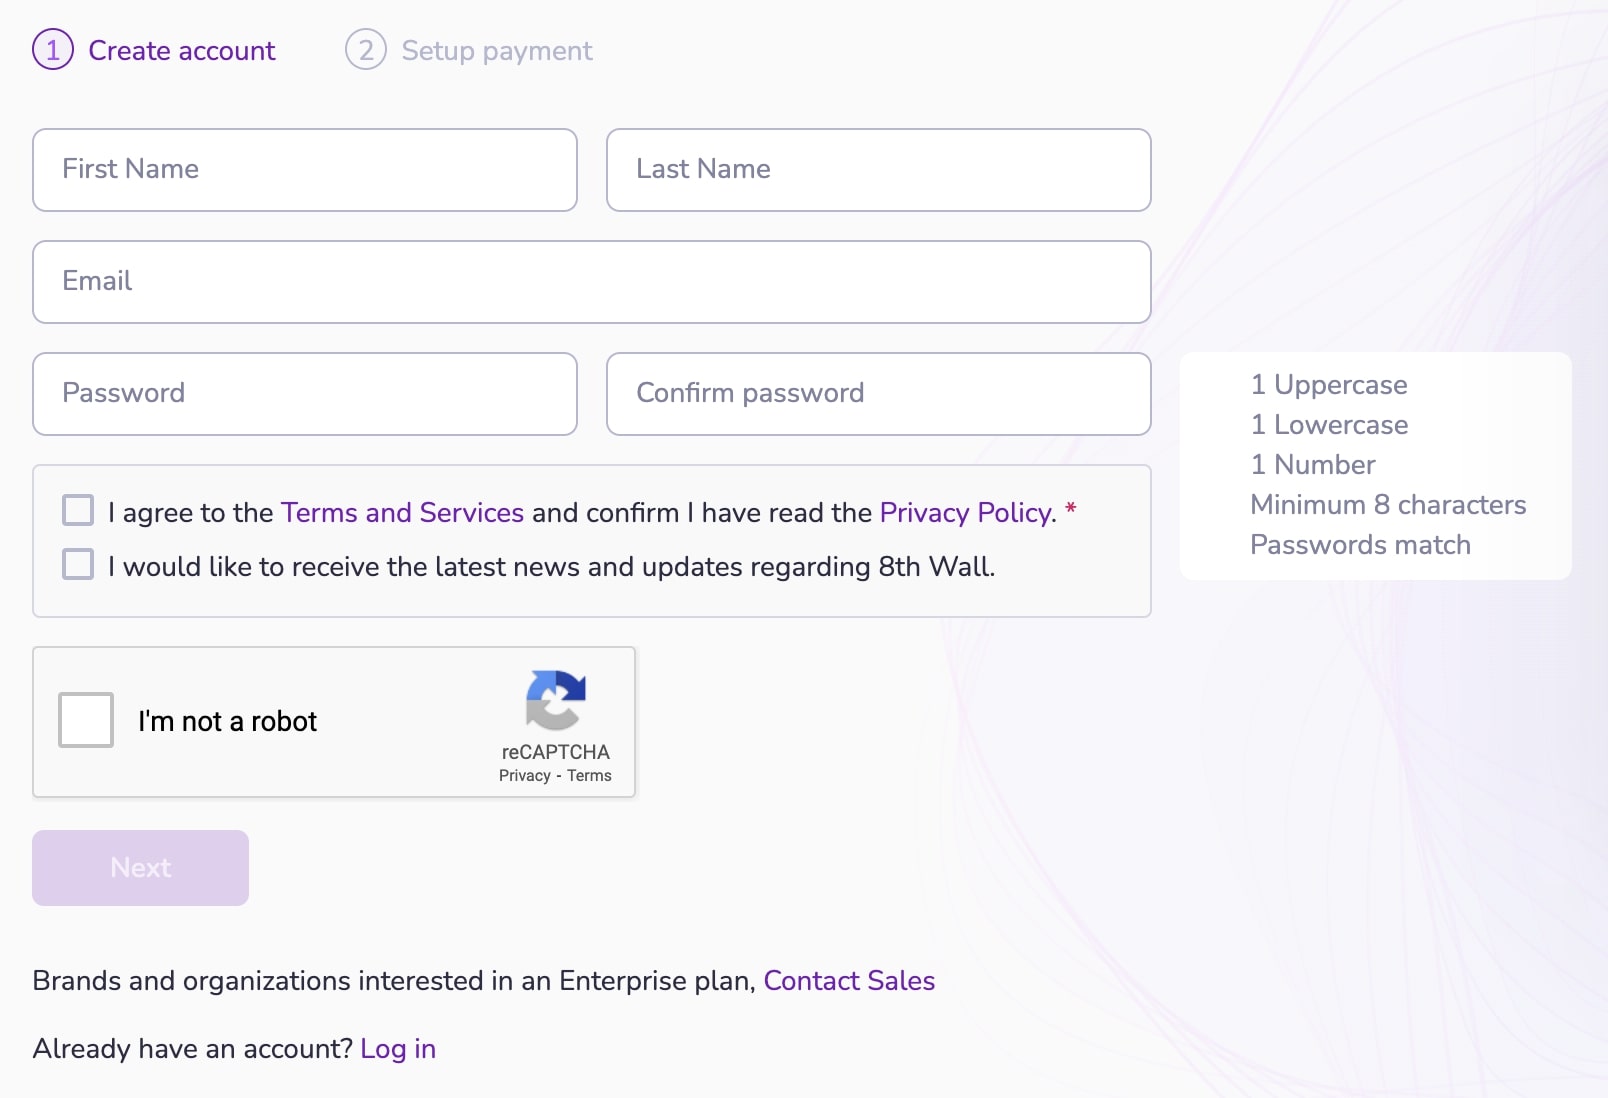
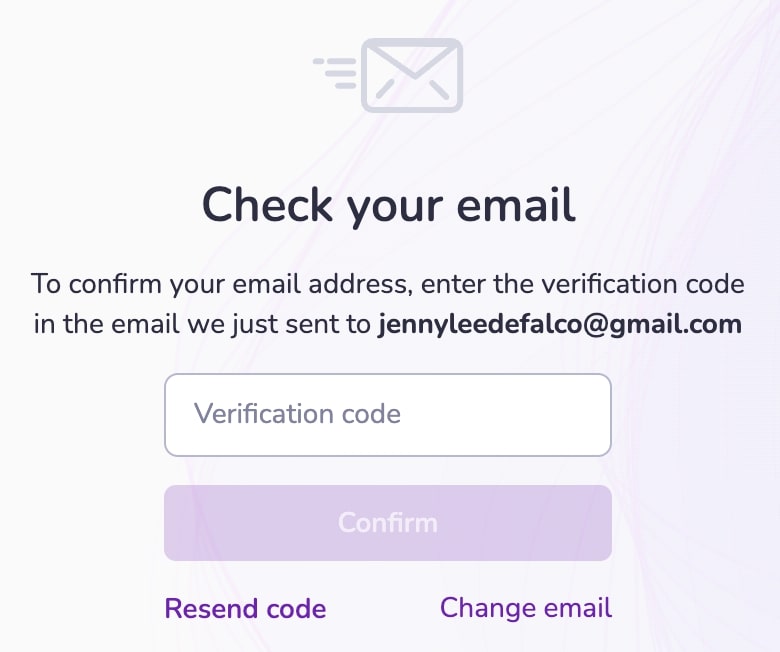
- メールアドレスを確認してください。 認証コードが記載されたEメールが送信されます。 認証コードを入力し、Confirm をクリックする。
- Continue**をクリックしてアカウント作成を完了します。
ワークスペースの作成
-
オプション:プロフィール画像を追加 - これは一般に公開されます。
-
ワークスペース名を入力します。 ワークスペース名を入力します。 この値は表示のみを目的としており、ワークスペースに関連付けられているURL( )には影響しません。
-
Niantic 8th Wall��の使用目的を選択してください。
-
あなたの役割に最も近いものを選択してください。
-
ワークスペースのURLを入力します。 ワークスペースのURLを入力します。 ワークスペースの名前には、 の会社名など、関連性のあるものを選んでください。 ワークスペースのURLを入力します。 ワークスペースの名前には、 の会社名など、関連性のあるものを選んでください。
重要です:この値は、アカウント内のすべての8th Wallがホストする プロジェクトのデフォルトのサブドメイン**として使用されます(例: mycompany.8thwall.app/project-name)。 この値は、あなたの公開プロフィールページのURLにも使用されます(例:www.8thwall.com/mycompany)。 この値は、あなたの公開プロフィールページのURLにも使用されます(例:www.8thwall.com/mycompany)。
この値は後で変更することはできないので、賢く選択してください!。
注:カスタムドメインをあなたの8th Wallホストプロジェクトに接続し、デフォルトの URLを上書きしたい場合は、こちらを参照してください。
新規プロジェクトの開始
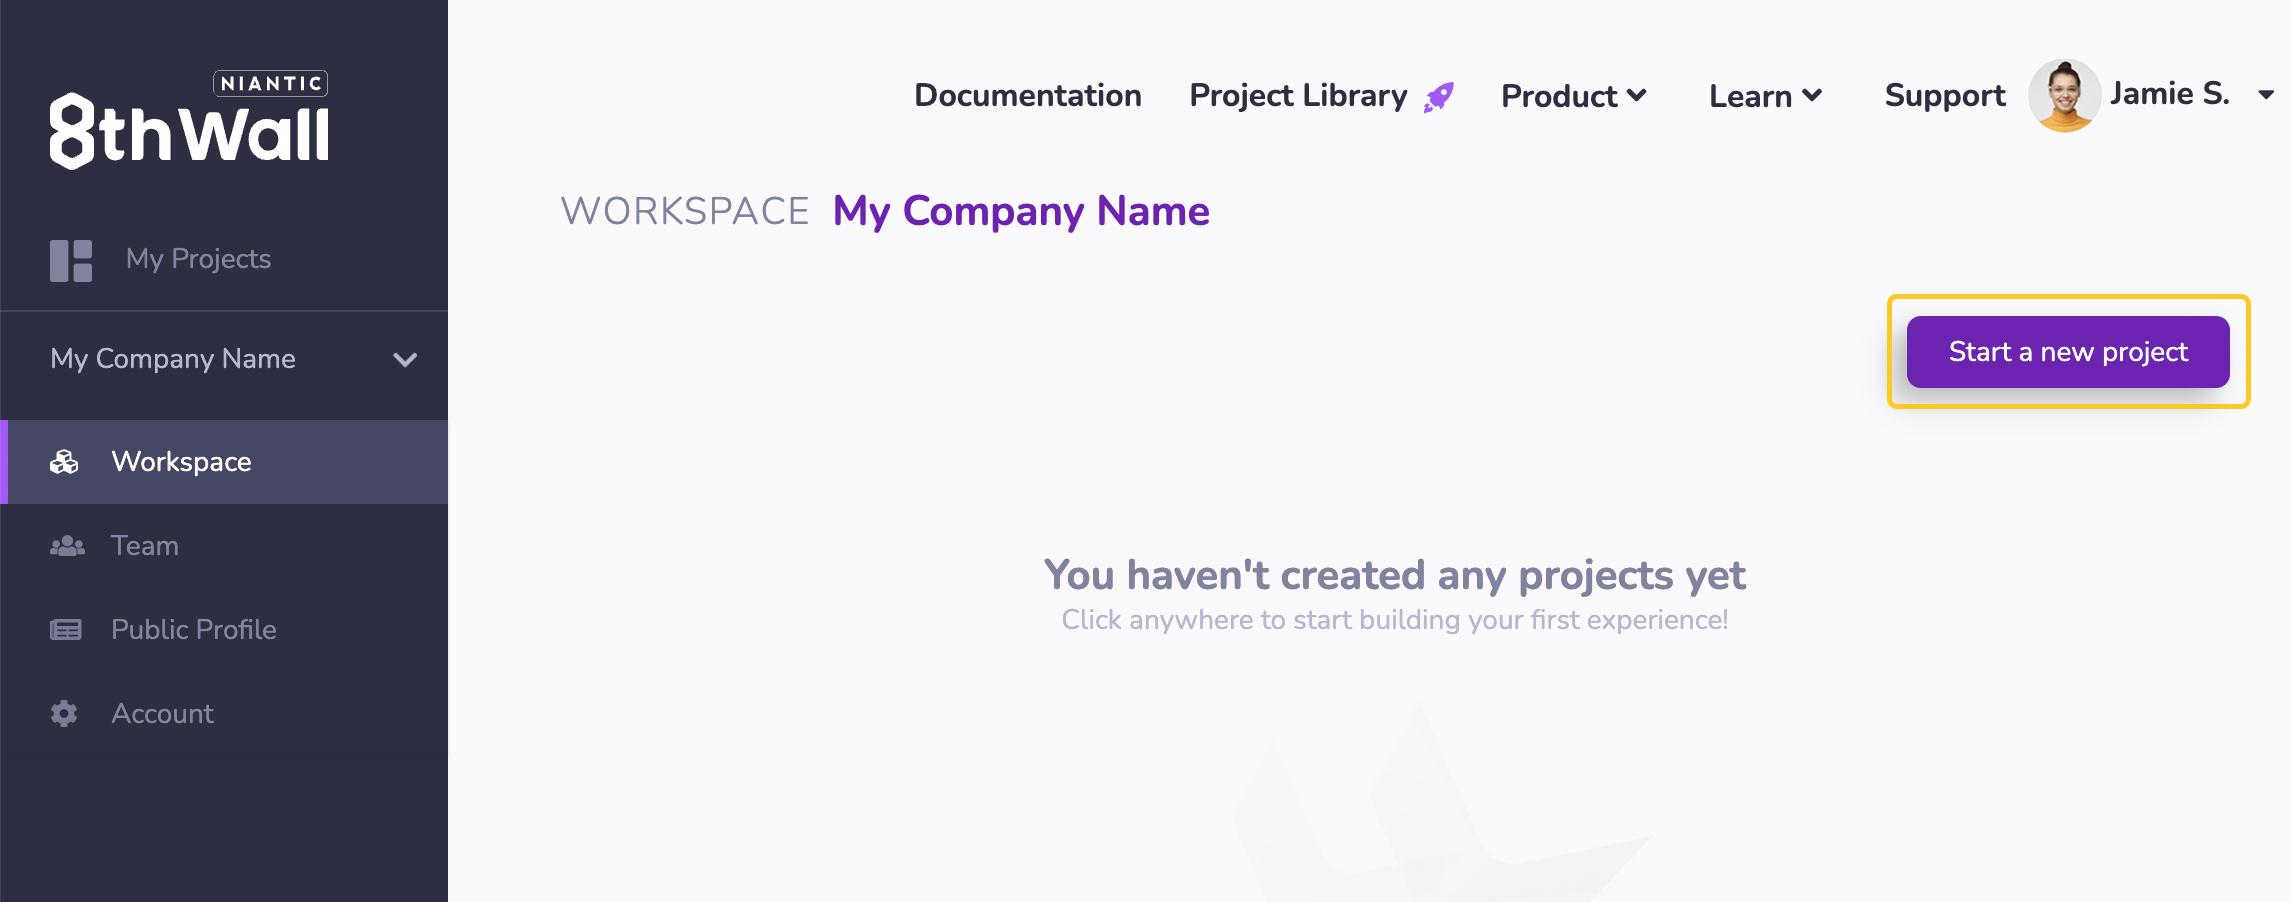
- ホームページ(ログイン済み)またはワークスペースのダッシュボードから、"Start a new Project "をクリックします。
-
**ホスティングタイプを選択してください:プロジェクトが 8th Wall Studioを使用するか、レガシーエディターを使用するかを前もって決めてください。 スタジオもエディターも8th Wallが主催している。 また、レガシープロプランのエンタープライズプラン( )のユーザーは、セルフホスティングを選択することもできます。 この設定は後から変更できない。 スタジオもエディターも8th Wallが主催している。 また、レガシープロプランのエンタープライズプラン( )のユーザーは、セルフホスティングを選択することもできます。 この設定は後から変更できない。
-
**プロジェクト名を選択してください: プロジェクト名は、デフォルトのプロジェクトURL(例:
mycompany.8thwall.app/project-name)と、注目のプロジェクトページのURL(例:www.8thwall.com/mycompany/project-name)の両方で使用されます。 **後で変更することはできません。 **後で変更することはできません。 -
**ライセンスタイプを選択してください。
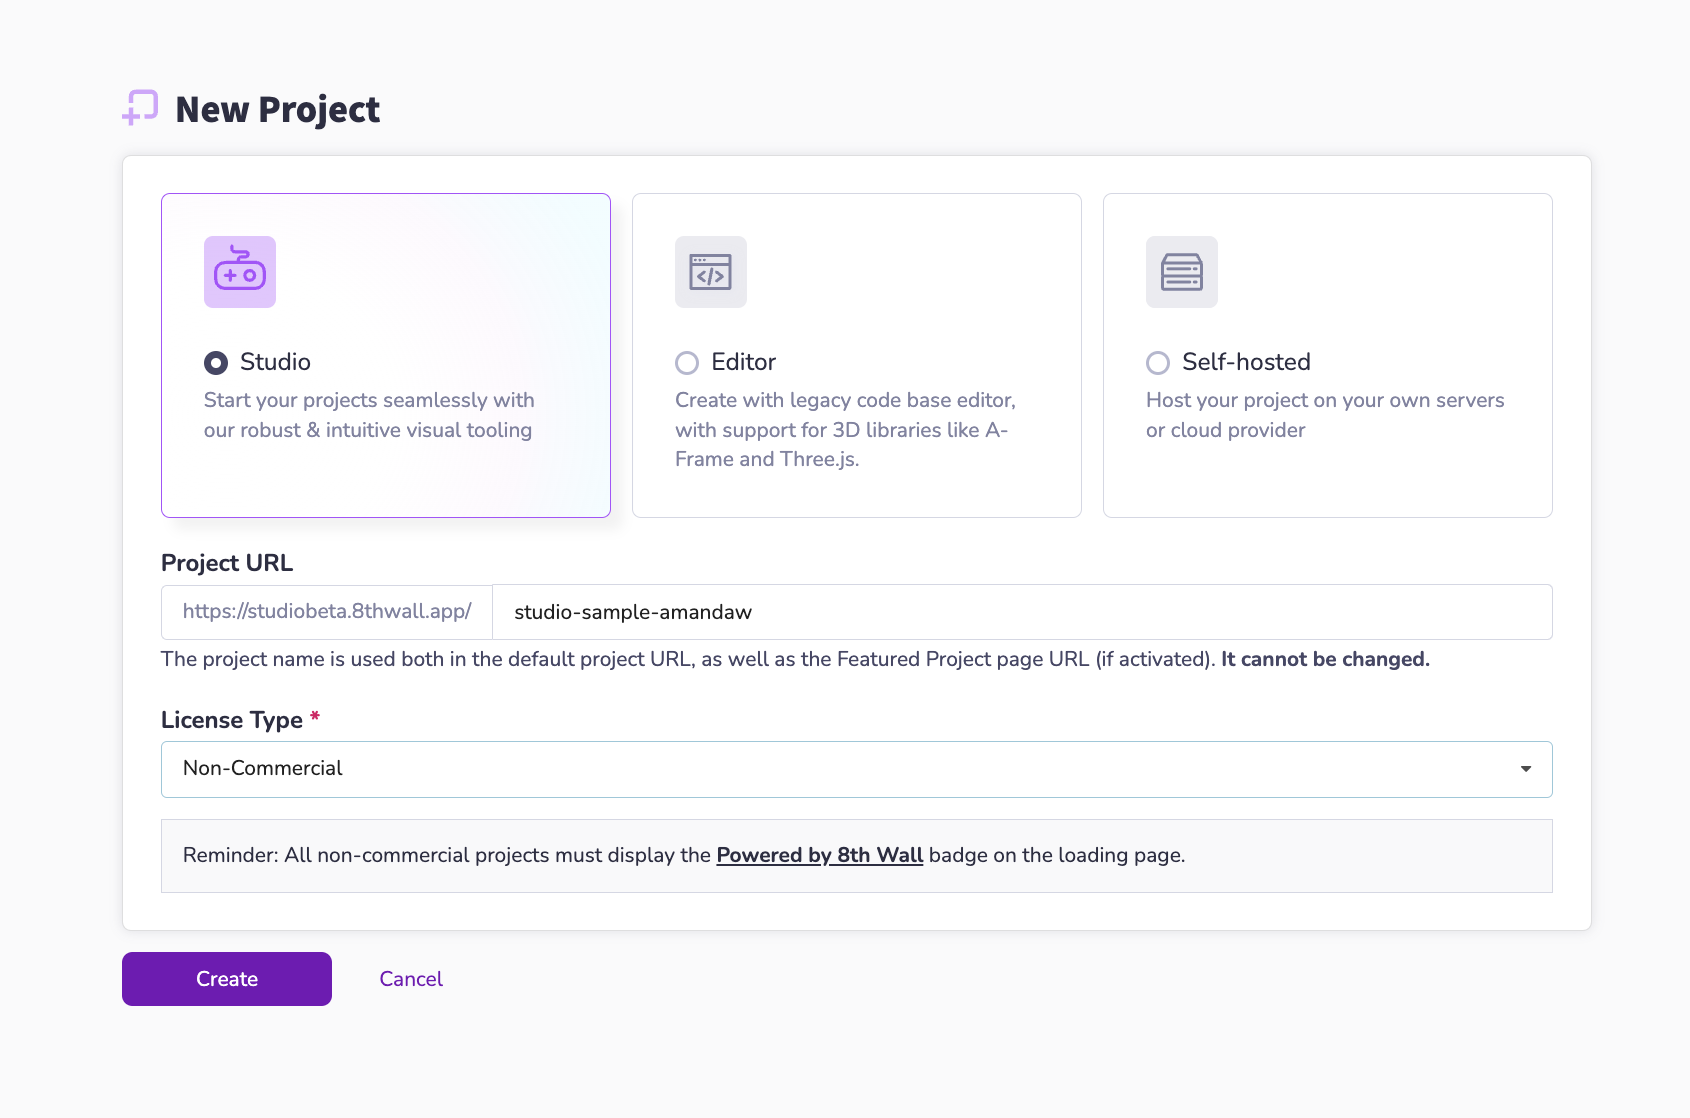
ライセンスの種類
-
商業用:商業用プロジェクトは商業利用を目的としています。 の商用プロジェクトを立ち上げ、世界中の人々に��見てもらう準備ができたら、商用 ライセンスを購入する必要があります。 商用ライセンスのオプションについては、 ウェブサイトの価格ページをご参照ください。 注: 商用ライセンスを購入するには、 のワークスペースがアクティブな Pro プランである必要があります。
-
デモ使用:デモプロジェクトは無制限に作成することができます。これは一般に公開され、 、見込みのある仕事を売り込むことを目的としています。 ローディング画面に "Demo Use Only "のラベルが表示されます。 プロジェクトの商業化を決定した場合は、プロジェクト ダッシュボードで「商業化」に切り替えてください。 ローディング画面に "Demo Use Only "のラベルが表示されます。 プロジェクトの商業化を決定した場合は、プロジェクト ダッシュボードで「商業化」に切り替えてください。
-
ウェブアプリ:このライセンスでは、無制限のファーストパーティプロジェクトを作成できます。 ウェブアプリプロジェクト はスプラッシュスクリーンを表示し続ける必要があり、 公開するとすぐに 8thwall.com で一般公開されます。 **このライセンスは、 商用ライセンスが必要なため、雇用のために作成されたプロジェクトを許可しません。 ウェブアプリプロジェクト はスプラッシュスクリーンを表示し続ける必要があり、 公開するとすぐに 8thwall.com で一般公開されます。 **このライセンスは、 商用ライセンスが必要なため、雇用のために作成されたプロジェクトを許可しません。
すべてのプロジェクトは、ローディングページにPowered by 8th Wall
バッジを表示しなければなりません。 これはデフォルトでロード・モジュールに含まれており、削除することはできない。
ロード画面のカスタマイズ方法については、こちらを参照してください。
クローンテンプレートプロジェクト
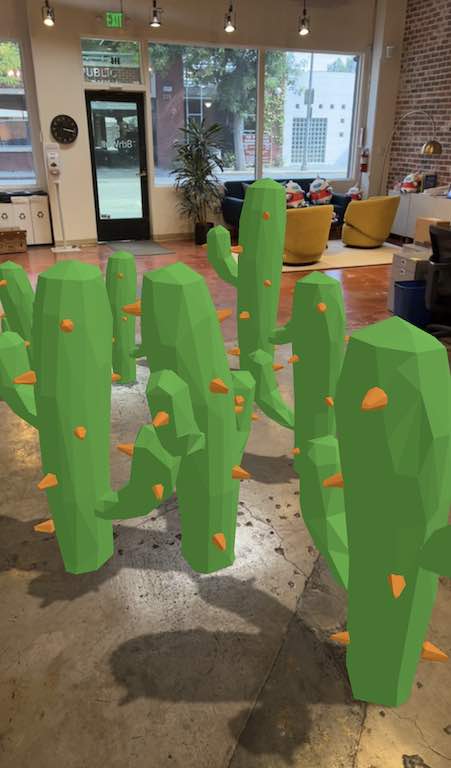
- プロジェクトを作成したら、クローンするテンプレートを選択します。 このガイドでは、**"A-Frame "を選択します:Tap to Place Ground "**を選択してください。 このインタラクティブな例では、タップすることによって、 前方の表面に3Dモデルを生成することができる。 レイキャスト、オブジェクトのインスタンス化、3Dモデルのインポート、 。
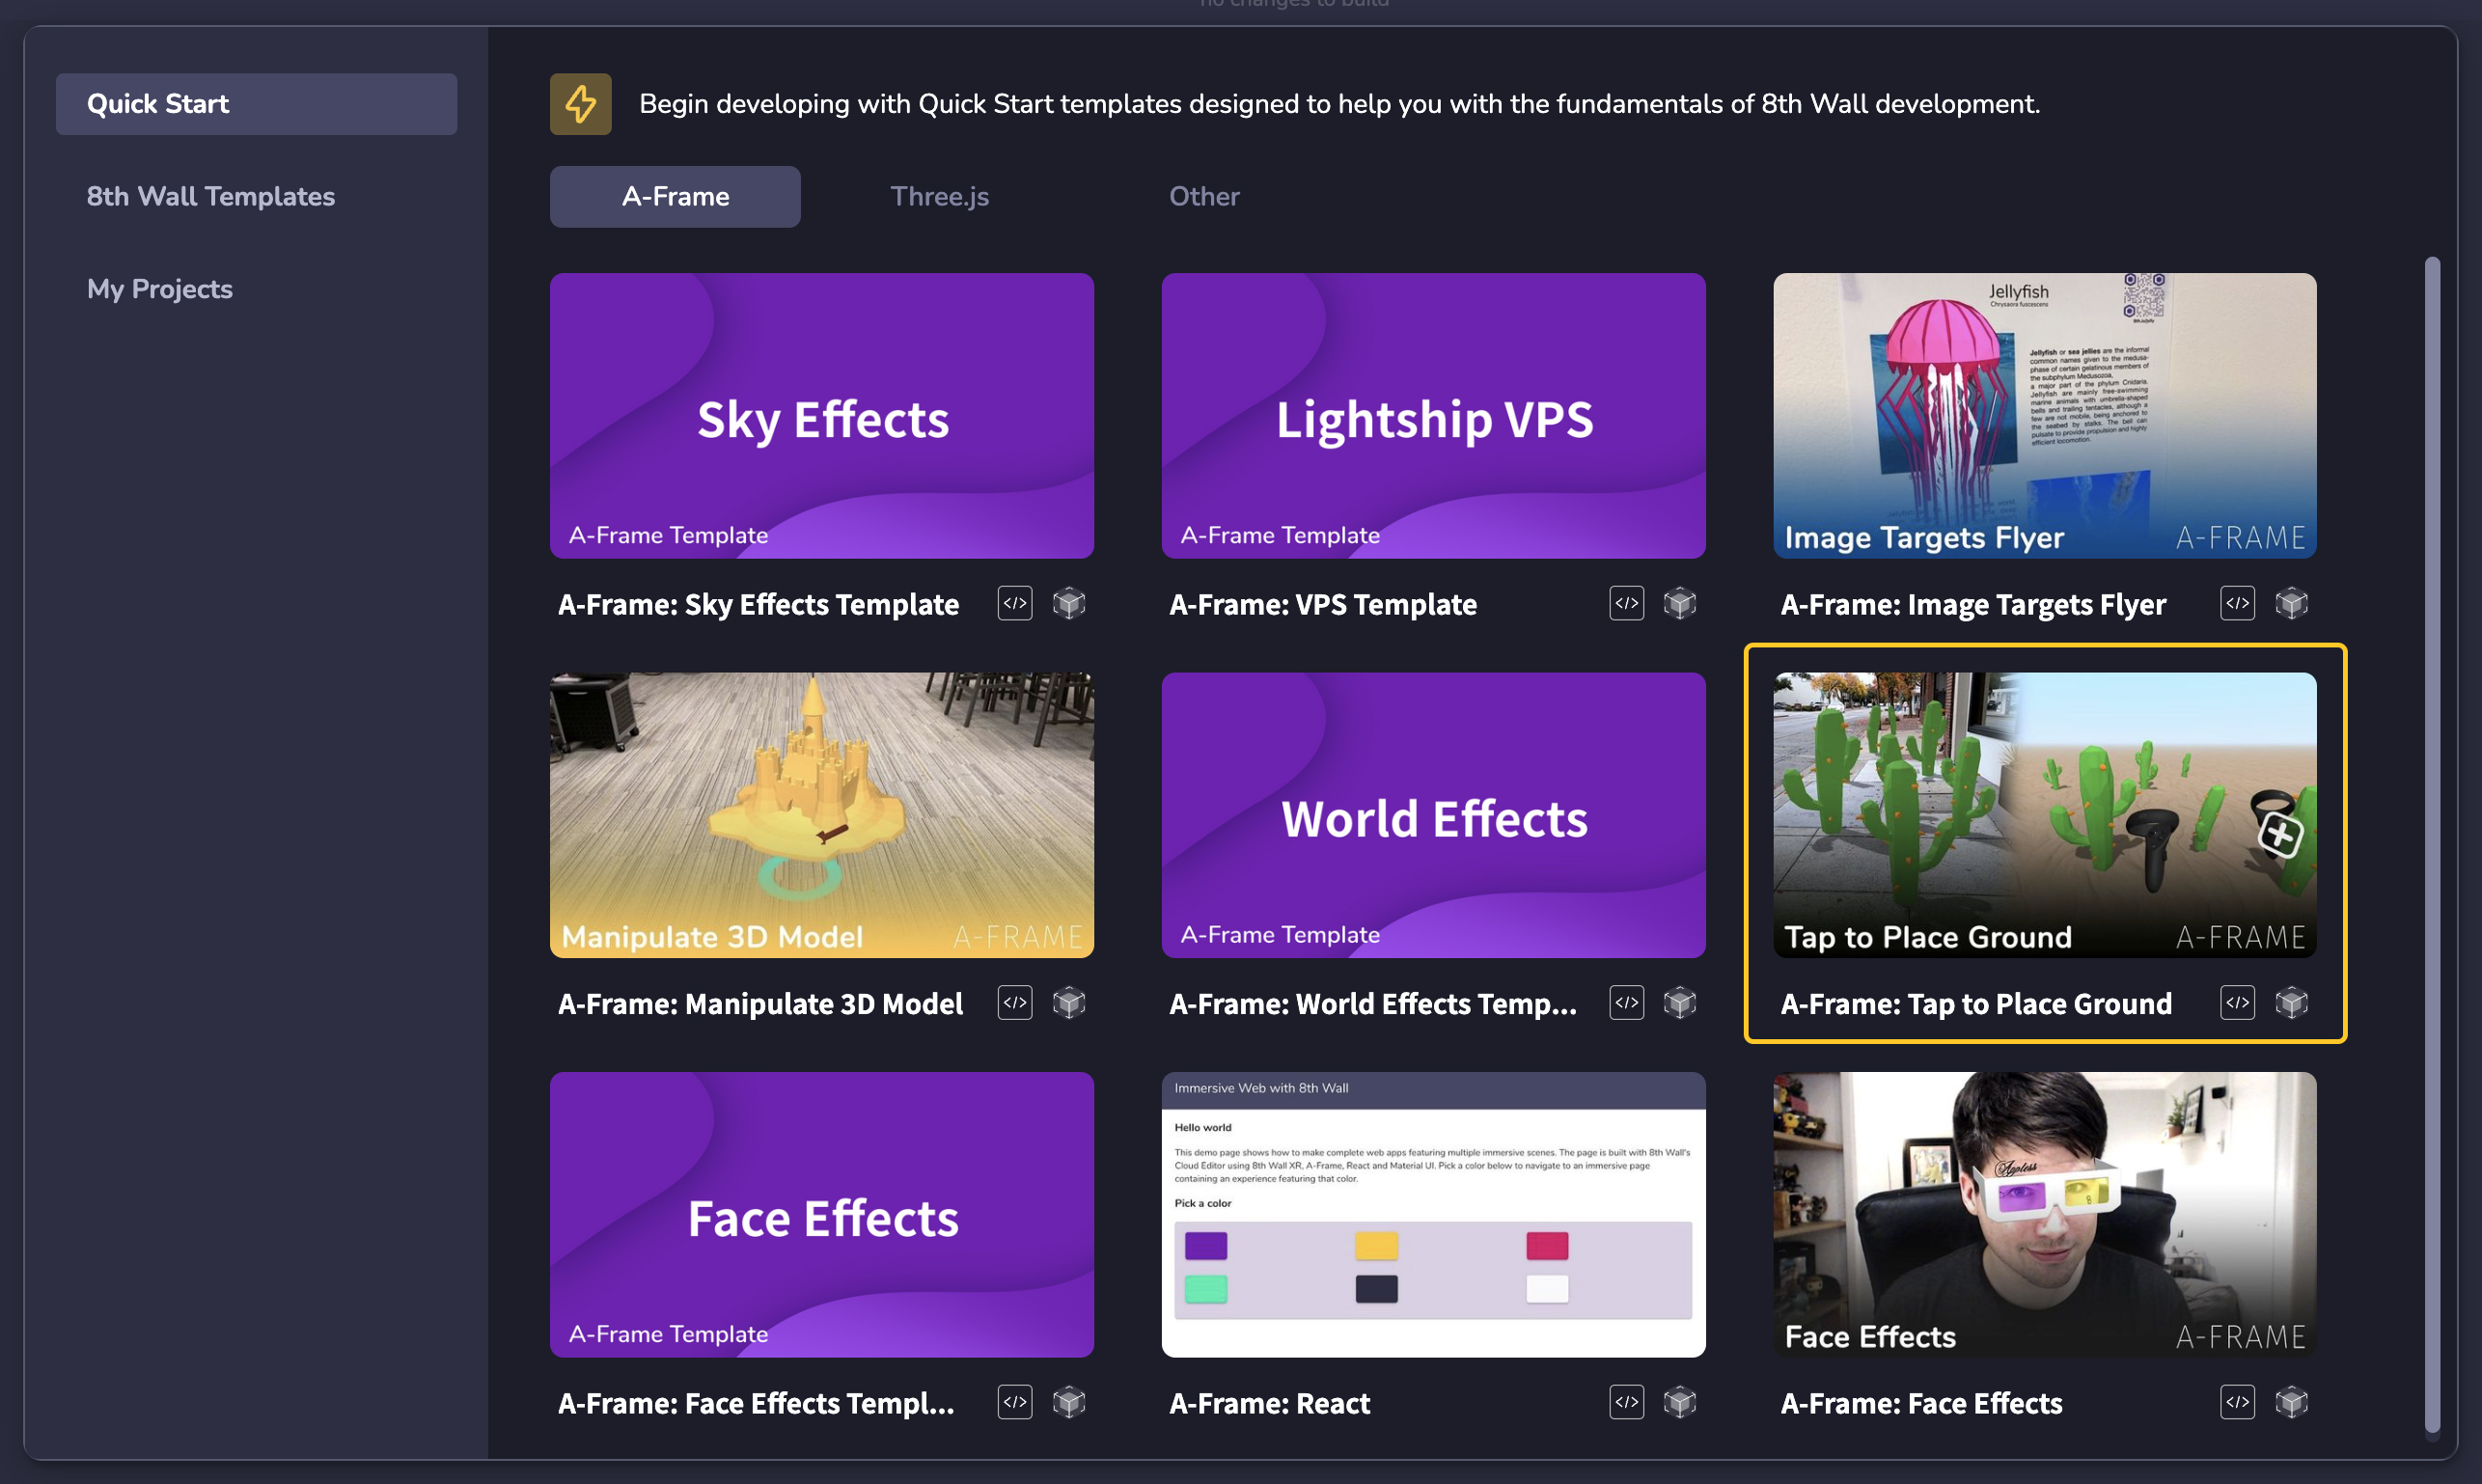
-
次の画面では、プロジェクトのREADMEが表示されます。 [オプション] クローン作成前にテンプレート をテストするには、Launch ボタンをクリックし、QR コードを携帯電話でスキャンします。
-
プロジェクトのクローン(Clone Project)ボタンをクリックしてください。 プロジェクトのクローン(Clone Project)ボタンをクリックしてください。 サンプル プロジェクトが ワークスペースにクローンされ、Cloud Editor が開きます。
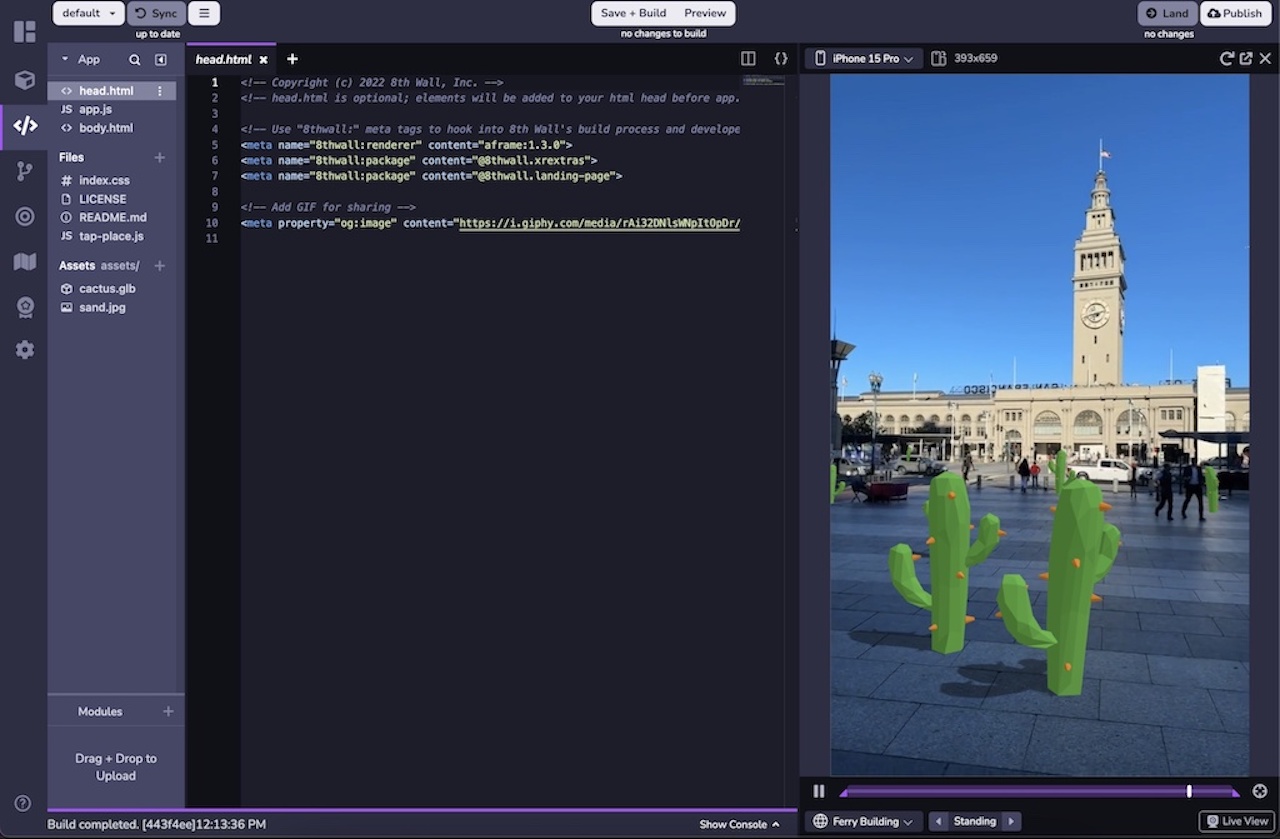
シミュレーター
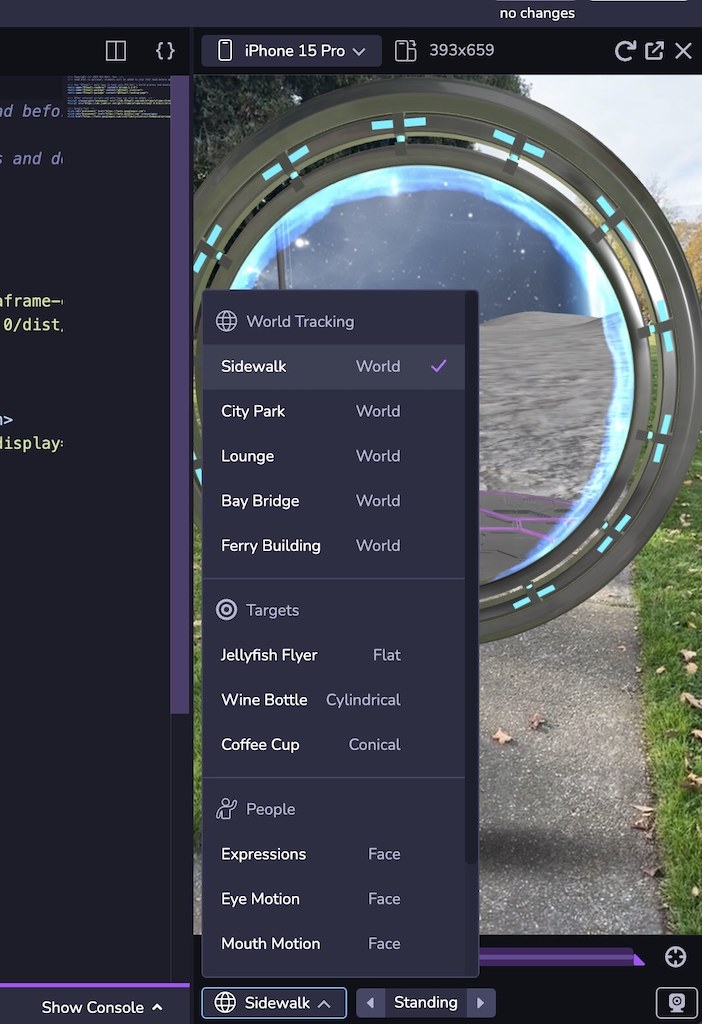
- シミュレータでは、クラウド エディタを離れることなく、さまざまなデバイスのビューポート サイズと シミュレートされた実世界のシーンで、プロジェクトの変更をテストおよび表示できます。 このシミュレーターは、 、収録済みのAR シーケンスのコレクション上でリアルタイムに8th Wall AR Engineを実行することで動作する。 クラウド エディタ ウィンドウの上部にあるプレビュー ボタンを使用してシミュレータにアクセスし、シミュレータ オプションを選択します。 シミュレーターのインスタンスはいくつでも開くことができ、 、さまざまなシナリオでプロジェクトの変更をテストすることができます。 **注:スカイエフェクト、VPS、カスタムイメージターゲット、インラインARなど、特定のAR 機能は、現時点ではシミュレートできません。
- フェイス 、ハンドトラッキング、ワールドエフェクト、アブソリュートスケール、シェアードARなど、さまざまなARシーケンスでシミュレーションを行うことができます。 ARシーケンスには、 ARをシミュレートできるように、ビデオ録画データとデバイスのジャイロスコープまたは方位記録データの両方が含まれています。 左下のシーケンス選択メニューを使用して、ARシーケンスを変更する。 カルーセル を使って、シーケンス・カテゴリーのオプションを切り替えることができる。 シーケンスの一時停止はビデオを一時停止するだけで、 、同じフレームでの変更をテストすることができます。 再生ハンドルをドラッグして、ループのイン/アウト点を設定する。
-
ライブビューは、プロジェクトのXR8コンフィギュレーションと同じロジックに従い、事前に記録されたARシーケンスの代わりに、デスクトップからのフィードを使用して、 、プロジェクトをシミュレートすることができます。 例えば、 あなたのプロジェクトがFace Effectsを使用し、デスクトップでCloud Editorを開いている場合、 デスクトップカメラが開きますが、World Trackingエクスペリエンスを開発しており、プロジェクトで "allowedDevices: any "が 有効になっている場合、Metaversal Deploymentの "desktop mode "が表示されるはずです。 注: the Simulatorのライブビューでは、プロジェクトで有効になっている に応じて、カメラ、マイク、または位置情報の許可を有効にするよう求めるメッセージが表示される場合があります。 ライブビューであなたの経験を見るために、許可プロンプトをクリックします。
-
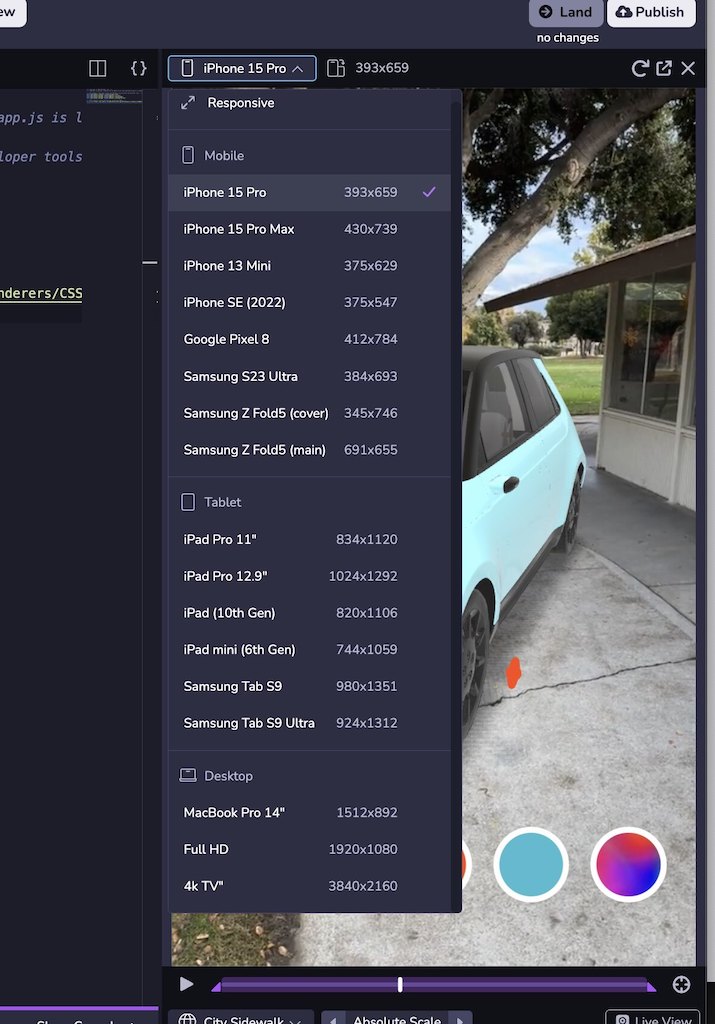
あなたのプロジェクトは、モバイルウェブ のビューポートサイズの違いによ��り、異なるデバイスでは異なって見えるかもしれません。 また、プロジェクトを横向きと縦向きの両方で見たい場合もあるでしょう。 シミュレーターの上部 左側では、一般的なデバイスのビューポートサイズから選択したり、 方向を変更したり、レスポンシブモードを使用してカスタムサイズに調整することができます。 また、シミュレータパネルの辺 をダブルクリックすると、選択したデバイス のビューポートの幅にシミュレータを自動的に合わせることができます。 **注:寸法はCSS論理ピクセル(別名ビューポート寸法)で表示され、 物理デバイスピクセルではありません。 セレクタからデバイスを選択すると、ビューポート寸法 のみが更新され、クライアントのユーザーエージェントは更新されません。 また、プロジェクトを横向きと縦向きの両方で見たい場合もあるでしょう。 シミュレーターの上部 左側では、一般的なデバイスのビューポートサイズから選択したり、 方向を変更したり、レスポンシブモードを使用してカスタムサイズに調整することができます。 また、シミュレータパネルの辺 をダブルクリックすると、選択したデバイス のビューポートの幅にシミュレータを自動的に合わせることができます。 **注:寸法はCSS論理ピクセル(別名ビューポート寸法)で表示され、 物理デバイスピクセルではありません。 セレクタからデバイスを選択すると、ビューポート寸法 のみが更新され、クライアントのユーザーエージェントは更新されません。
- シミュレーターには、以下のような再生コントロールや便利な機能がある:
- プレイバー、スクラバー、イン/アウトハンドル:ループ・ポイントを設定し、選択したシーケンスの を細かくコントロールできる。
- Recenterボタン(右下):XR8.XrController.recenter()\`を呼び出し、カメラの フィードを原点に戻します。 **注:Recenterは、シーケンスがループするたびに、また、 新しいシーケンスが選択されるたびに呼び出される。 **注:Recenterは、シーケンスがループするたびに、また、 新しいシーケンスが選択されるたびに呼び出される。
- 更新ボタン(右上):ページを更新し、キャッシュされたコンテンツを保持します。 更新ボタン(右上):ページを更新し、キャッシュされたコンテンツを保持します。 SHIFTを押しながら 、更新ボタンをクリックすると、キャッシュされたコンテンツを無視して完全なリロードが実行されます。
ライブ・プレビュー
-
クラウドエディタウィンドウの上部で、プレビューボタンをクリックします。
-
モバイル機器でQRコードをスキャンすると、ウェブブラウザが開き、WebARプロジェクトのライブプレビューを見ることができます。

- �ページがロードされると、モーションセンサーとオリエンテーションセンサー(一部の
デバイス)およびカメラ(すべてのデバイス)へのアクセスを求めるプロンプトが表示されます。 すべての許可プロンプトに対して許可をクリックします。
、このプロジェクトの非公開開発URLに移動します。
注意:クラウド エディタ内に表示される「プレビュー」QRコードは、クラウド エディタでアクティブに作業している間、開発者が使用するためだけの一時的な、1回限りの使用QR コードです。 このQRコード( )は、非公開の開発用URLにアクセスするもので、他人がアクセスすることはできない。 あなたの作品を 他者と共有するには、以下のプロジェクトの公開のセクションをご覧ください。 このQRコード( )は、非公開の開発用URLにアクセスするもので、他人がアクセスすることはできない。 あなたの作品を 他者と共有するには、以下のプロジェクトの公開のセクションをご覧ください。
-
WebARプレビューがロードされたら、目の前のサーフェスをタップして3Dモデルをスポーンさせます。
-
結果
セーブ、ビルド、ランド
この時点で、完全に動作するWeb ARプロジ�ェクトが完成し、モバイルデバイスでプレビューできるようになりました。 次に、プロジェクトを更新し、新しいコードをプレビューし、 、変更をソース・コントロールに取り込む方法を説明するために、非常に小さなコード変更を行う。 次に、プロジェクトを更新し、新しいコードをプレビューし、 、変更をソース・コントロールに取り込む方法を説明するために、非常に小さなコード変更を行う。
-
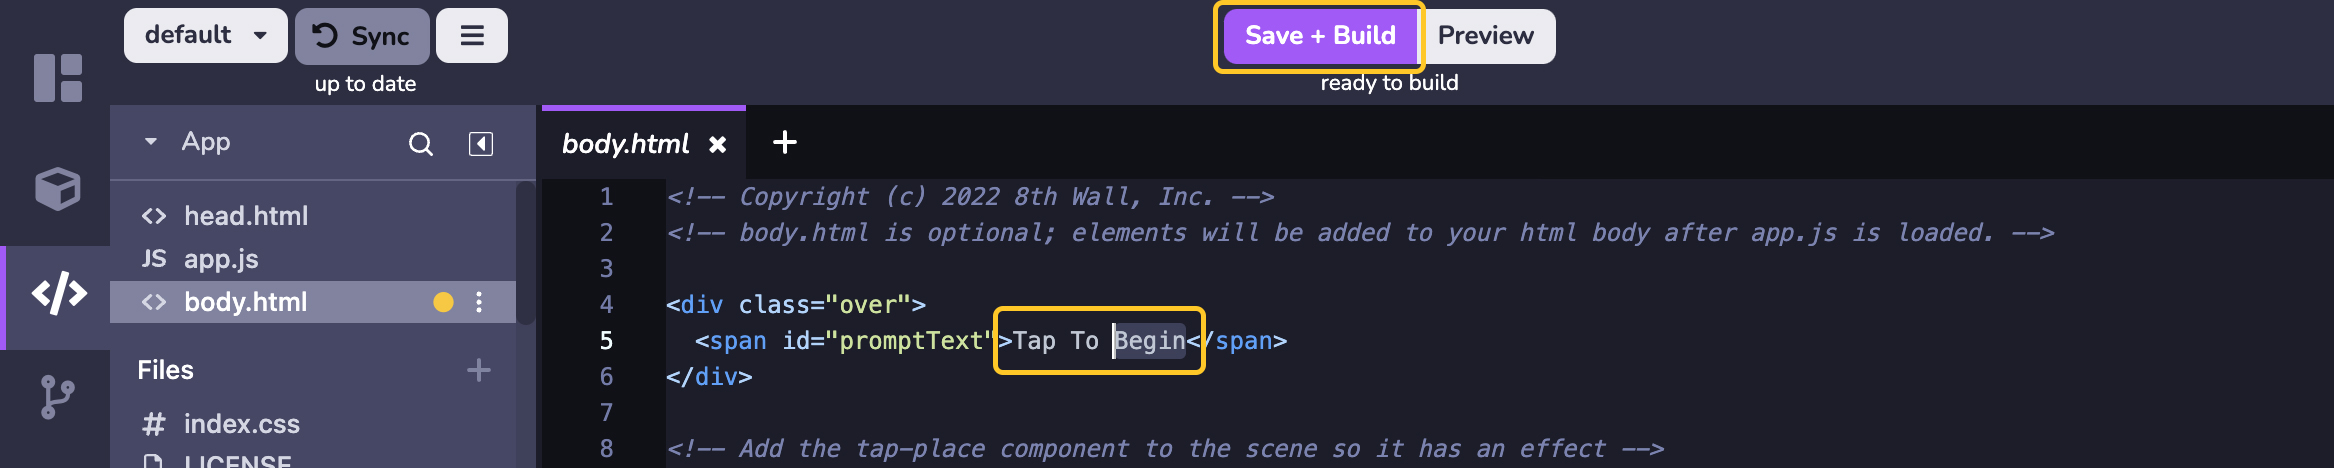
クラウド エディタ プロジェクトの
body.html内で、promptTextに小さなテキスト変更を加えます。 の例では、テキストをTap To Place ModelからTap To Beginに変更するだけです。 の例では、テキストをTap To Place ModelからTap To Beginに変更するだけです。 -
Save + Build\`をクリックして作業を保存し、プロジェクトの新しいクラウドビルドを開始します。
-
ステップ2でプレビュー QRコードをスキャンした後、モバイルブラウザを開いたままにしておくと、ビルドが完了した時点で携帯電話 が自動的に再読み込みされます。 モバイルブラウザのページが開かなくなった場合は、 プレビューQRコードを再度スキャンして、プロジェクトの更新をプレビューしてください。 ステップ2でプレビュー QRコードをスキャンした後、モバイルブラウザを開いたままにしておくと、ビルドが完了した時点で携帯電話 が自動的に再読み込みされます。 モバイルブラウザのペ��ージが開かなくなった場合は、 プレビューQRコードを再度スキャンして、プロジェクトの更新をプレビューしてください。 モバイルブラウザのページが開かなくなった場合は、 プレビューQRコードを再度スキャンして、プロジェクトの更新をプレビューしてください。
-
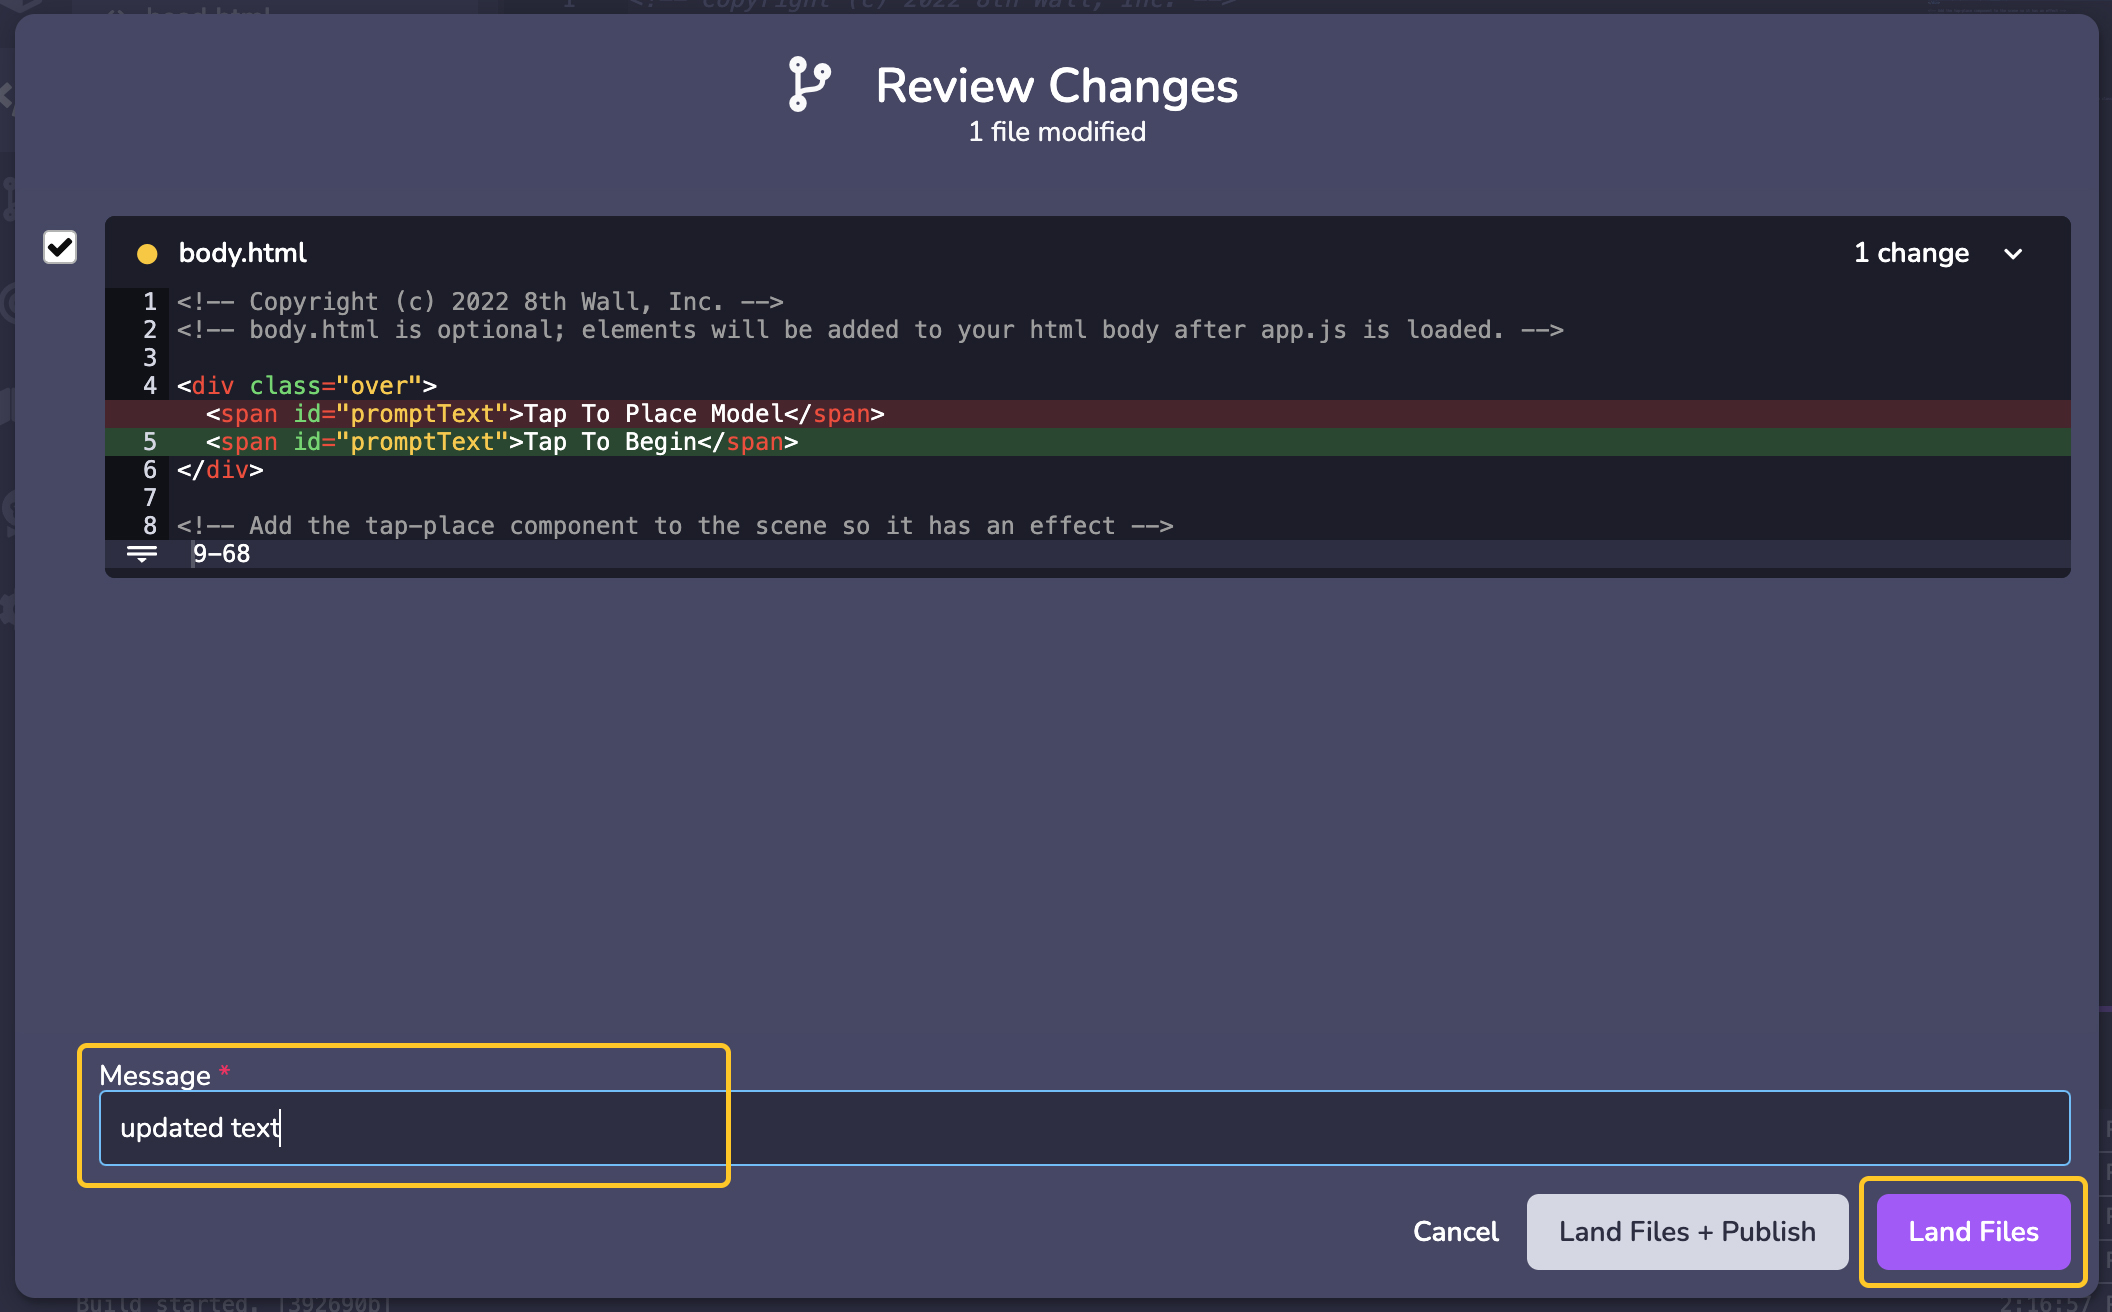
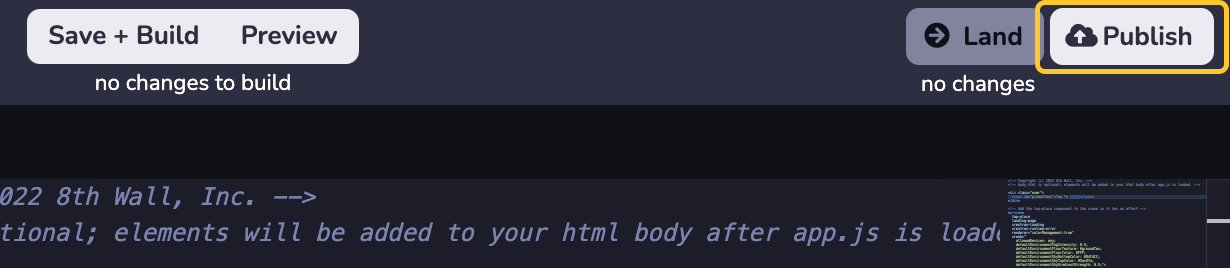
変更に満足したら、更新したコードをクラウド エディタに統合された ソース コントロールに 配置 します。 Cloud Editorウィンドウの右上にあるLandをクリックします。 このボタンは、 緑で表示されます。これは、まだソース コントロールにランディングされていない変更がプロジェクトにあることを示します: Cloud Editorウィンドウの右上にあるLandをクリックします。 このボタンは、 緑で表示されます。これは、まだソース コントロールにランディングされていない変更がプロジェクトにあることを示します:
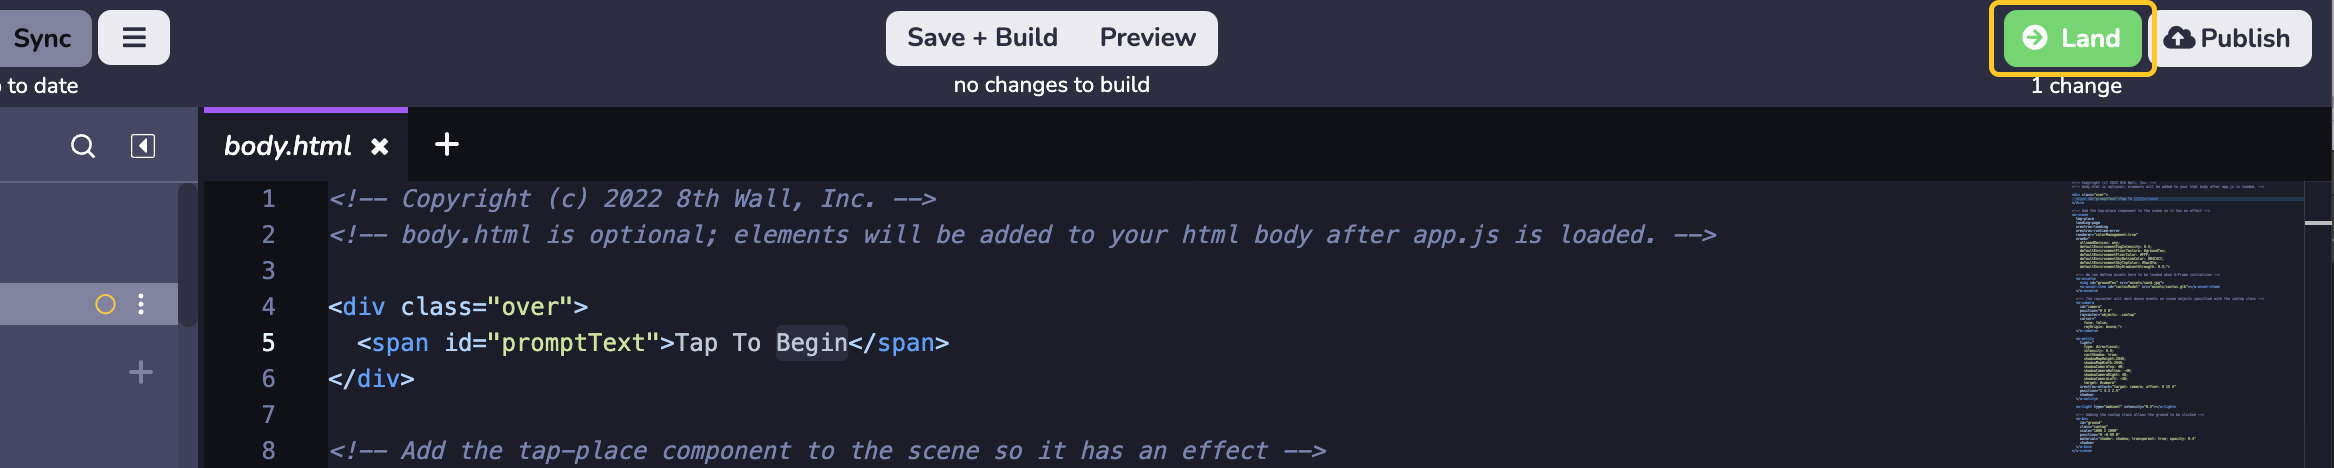
- Message**フィールドに変更内容を簡潔に入力し、Landをクリックします:
プロジェクトを公開する
最後のステップは、8th Wallのビルトイン ホスティングを�使用して、更新されランディングされたプロジェクトコードを公開することです。 これにより、このプロジェクトはインターネット上で誰でも公開閲覧できるようになる。 これにより、このプロジェクトはインターネット上で誰でも公開閲覧できるようになる。
注:商用プロジェクトは、開始時に追加の商用ライセンスが必要です。 詳細は https://www.8thwall.com/pricing を参照。
すべてのプロジェクトは、ローディングページにPowered by 8th Wall
バッジを表示しなければなりません。 これはデフォルトでロード・モジュールに含まれており、削除することはできない。
ロード画面のカスタマイズ方法については、こちらを参照してください。
- Cloud Editorウィンドウの右上にあるPublishをクリックします。
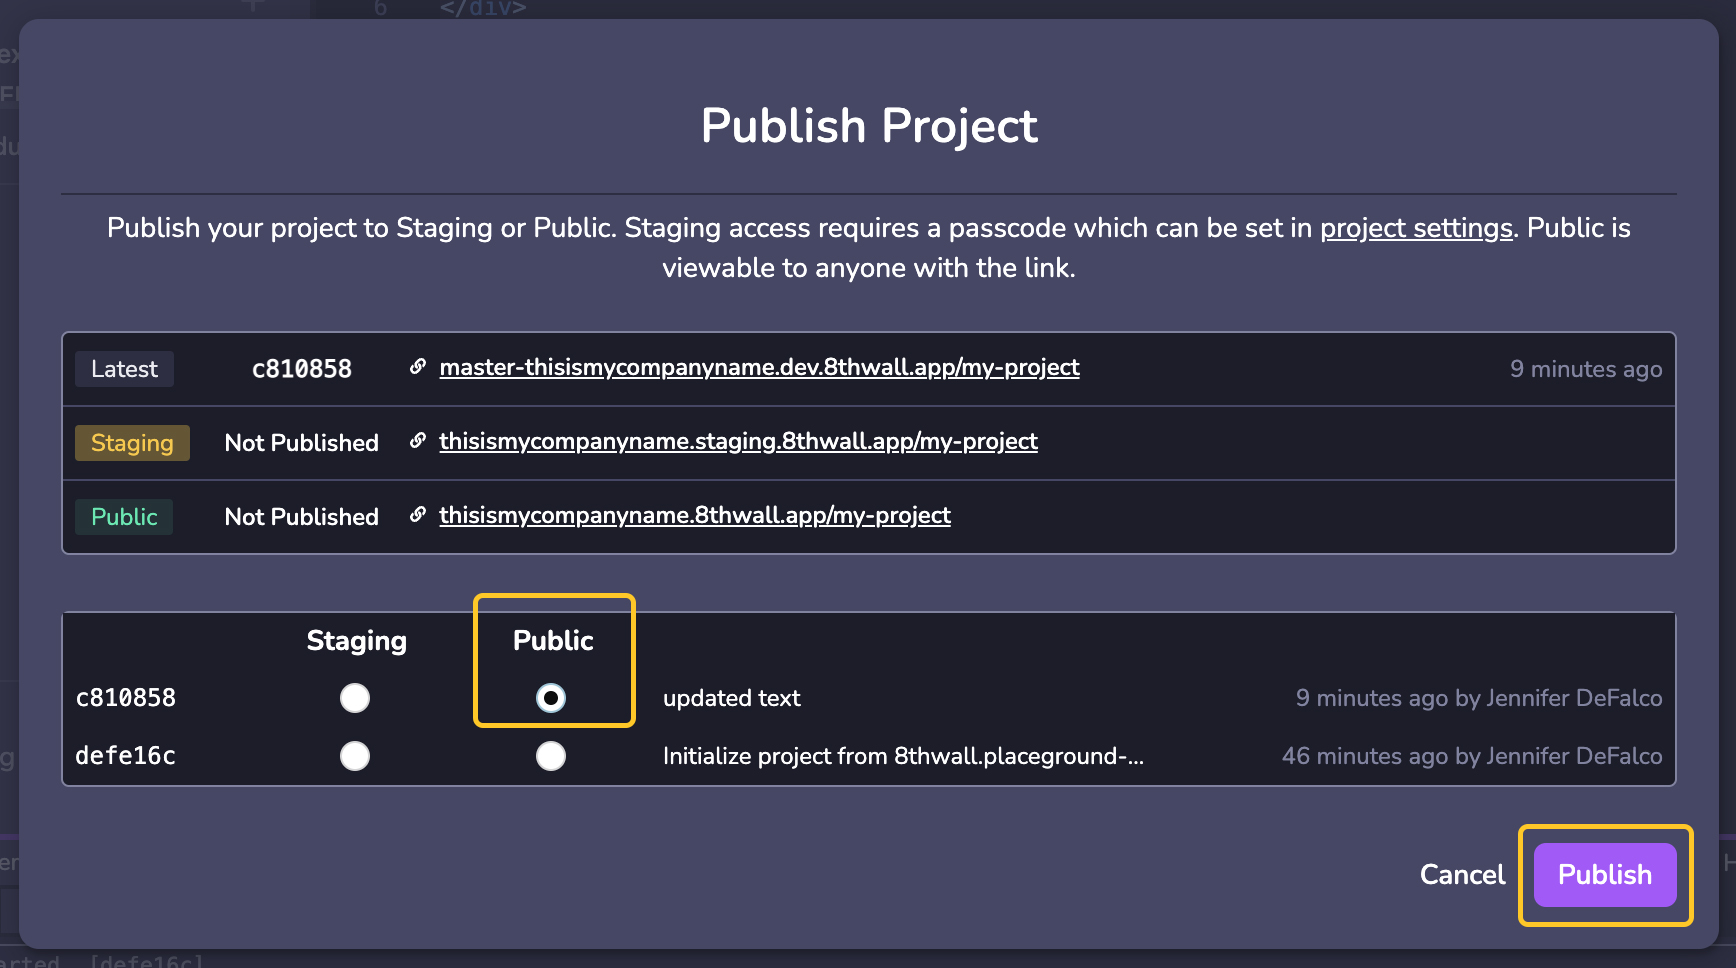
- Publish Project** モーダルでは、コミットのリスト( コードのバージョンごとに 1 つずつソースコントロールにランディング)と、 プロジェクトの Development(開発)、Staging(ステージング)、Public(公開)の URL が表示されます。 Publish Project** モーダルでは、コミットのリスト( コードのバージョンごとに 1 つずつソースコントロールにランディング)と、 プロジェクトの Development(開発)、Staging(ステージング)、Public(公開)の URL が表示されます。 Public**カラムの一番上のラジオボタンを選択すると、最新/最新バージョンの コードをプロジェクトのPublic URLにデプロイし、Publishをクリックします:
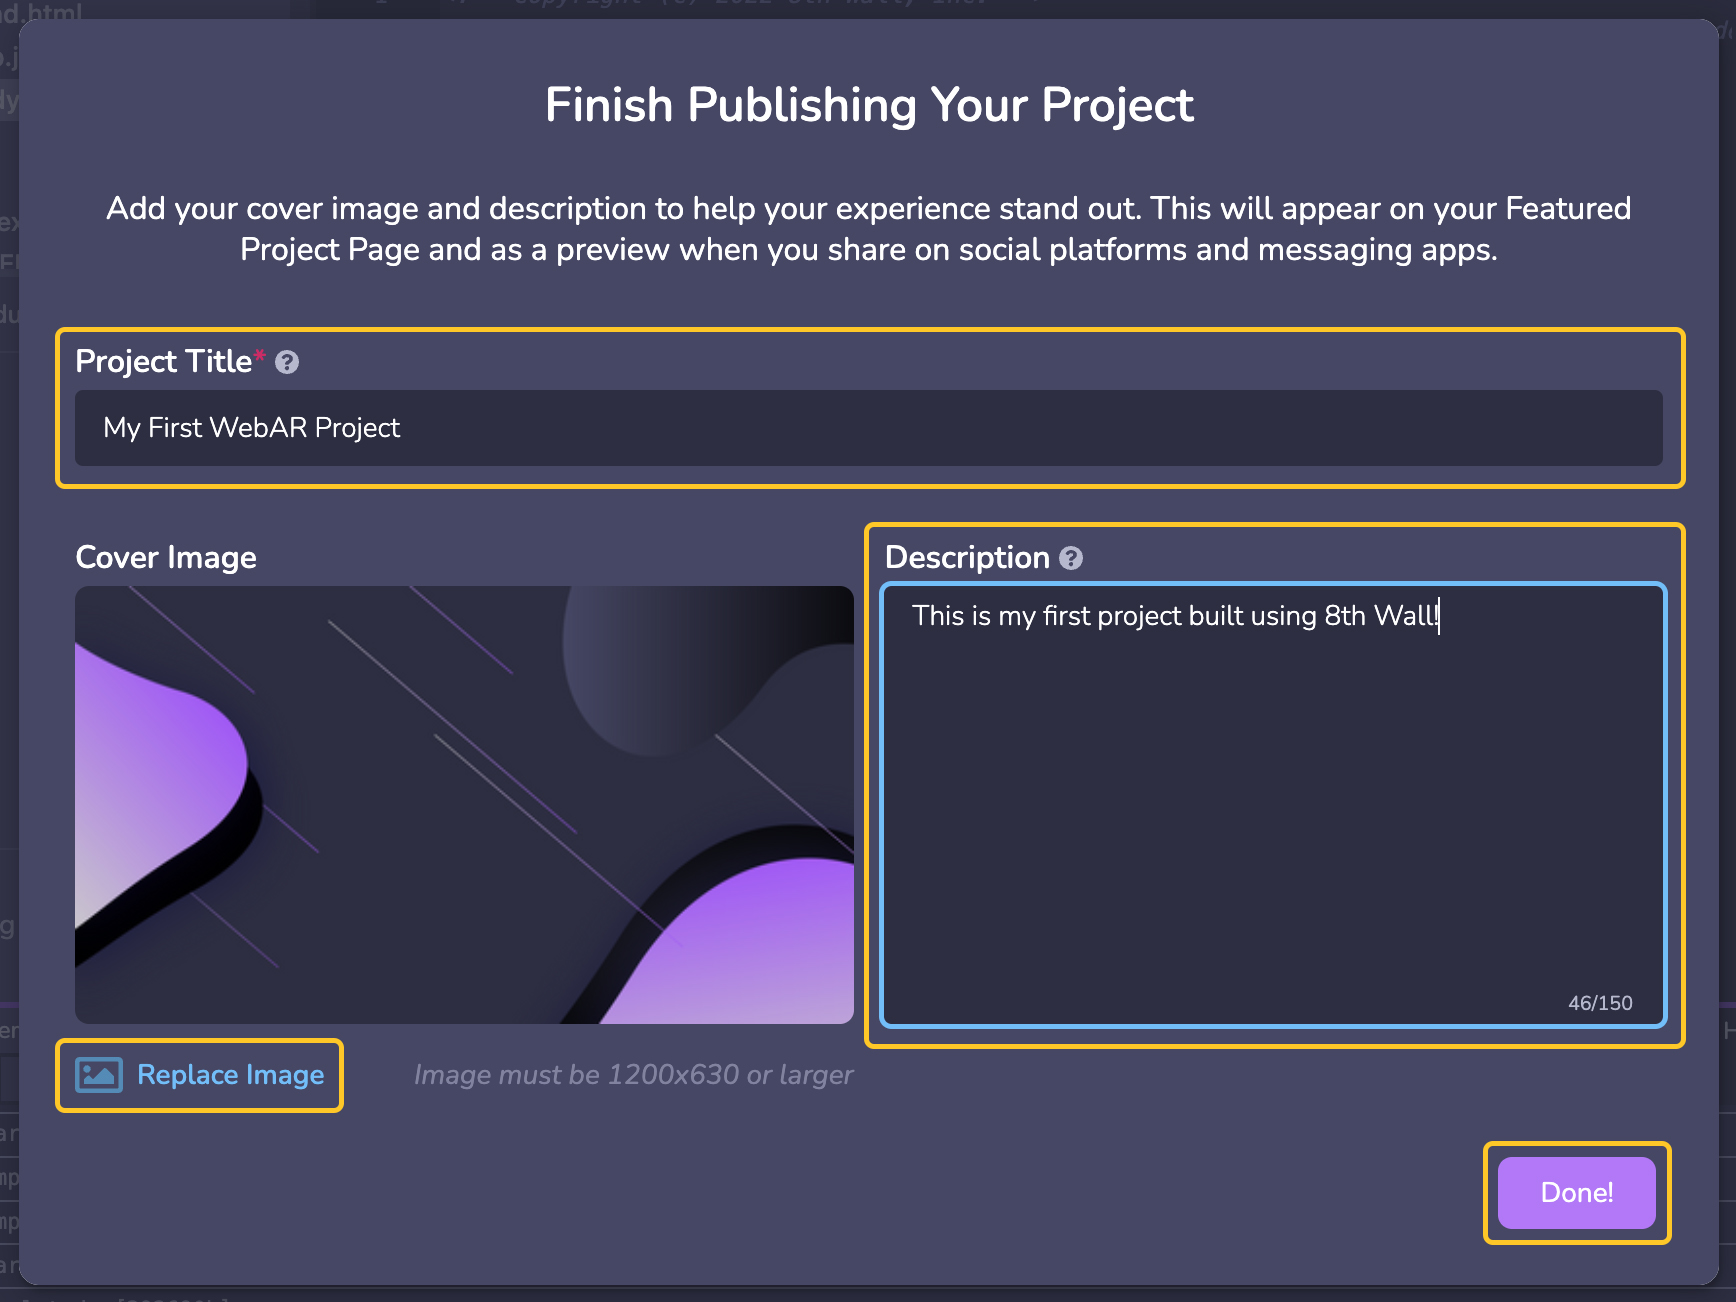
- プロジェクトにタイトル、説明、カバー画像を付けて、公開プロセスを完了します。 プロジェクトにタイトル、説明、カバー画像を付けて、公開プロセスを完了します。 この 情報は、あなたの注目プロジェクトページに表示され、ソーシャルプラットフォーム やメッセージングアプリで共有する際にプレビューとして表示されます。 プロジェクトにタイトル、説明、カバー画像を付けて、公開プロセスを完了します。 この 情報は、あなたの注目プロジェクトページに表示され、ソーシャルプラットフォーム やメッセージングアプリで共有する際にプレビューとして表示されます。
公開プロジェクトを見る
-
左ナビゲーションのプロジェクトダッシュボードに戻る。 左ナビゲーションのプロジェクトダッシュボードに戻る。 QR 8.code**セクションでは、 PublicプロジェクトのURLが、8th.ioショートリンクと関連するQRコードとともに表示されます。
-
モバイル機器でQRコードをスキャンすると、Public Web AR体験が表示されます。
